Designer Christmas Table Centerpiece Tutorial

I can’t wait to show you how easy it is to make a centerpiece in this designer Christmas Table Centerpiece Tutorial. With just a few basic tips and tools, you can make one for your own home using the colors that you find at your local craft store. This post contains some affiliate links for your crafting convenience. Click here to read my full disclosure policy.
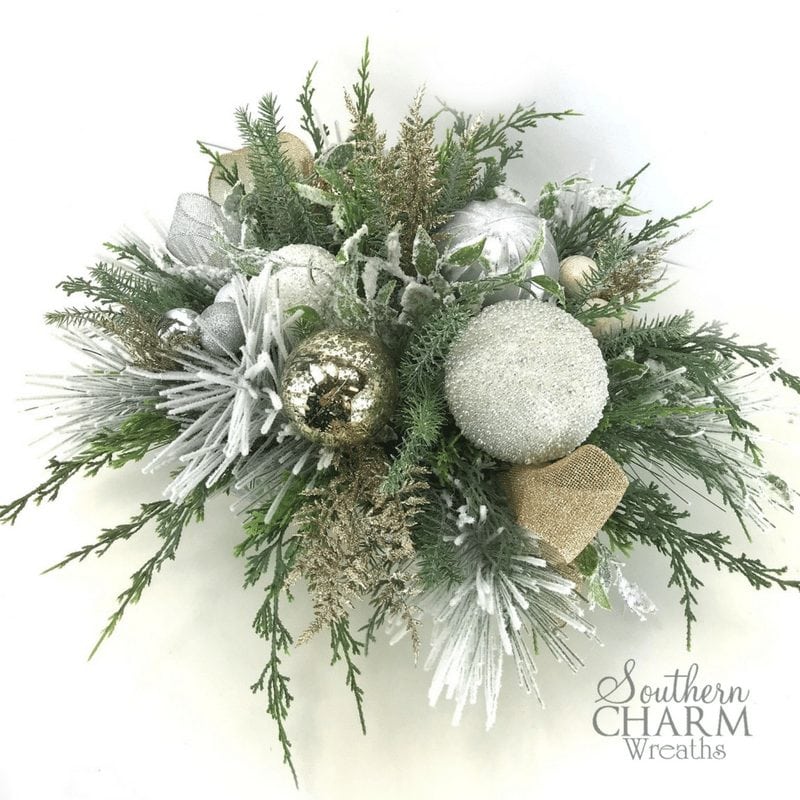
Designer Christmas Table Centerpiece Tutorial
In today’s video, we’re creating a Designer Christmas Table Centerpiece! This is a simple centerpiece to make and can be customized with any colors for any occasion. Here’s how:
Supplies
- Wood tray (3-pack at Walmart)
- Styrofoam like this or Dessert Foam would work
- Chalk Couture Holly Jolly transfer
- Chalk Couture Evergreen Chalkology Paste
- Assorted silk greenery
- Christmas ornaments (I used gold, silver & white plastic ornaments)
- Wired ribbon
- Wood picks
- Florist wire
- Wire cutters
- Hot glue gun or Glue Skillet
- Glue sticks or glue pillows
- Craft mat
[Tweet “How to make a Designer Christmas Table Centerpiece”]
Designer Christmas Table Centerpiece Tutorial
- Cut Styrofoam to fit inside the tray. For this sized tray I cut two pieces and then added a bit of hot glue to the tray before placing the Styrofoam in to ensure a snug fit.
- Next, it’s time to decorate the tray with Chalk Couture. Start by cutting the Holly Jolly transfer in half to separate the two words.
- Follow the Chalk Couture instructions to apply the Holly Jolly transfer to the wooden tray. Hey, watch when I did my first Chalk Couture project here.

- Allow the Chalkology paste to dry – this happens very quickly!
- Now we’ll start the arrangement. I began with a flocked greenery stem and cut it into pieces. Note: You could start by adding some greenery from a garland as your base as well or even moss to cover the Styrofoam.
- To adhere the greenery stems for the base, add a wood pick or steel pick to the bottom of the stem, add a bit of hot glue and insert into the base at an angle. I added approximately 7 stems around the outer perimeter of the tray.
- Continue adding greenery to fill in the tray. Note: Choose greenery with a variety of colors and textures for maximum impact.
- Once the tray is full with greenery, move on to adding ornaments.
- To prep the ornaments, I first added a bit of hot glue to the hanger to ensure it will stay securely on the ornament.
- Next, double up a piece of wire (should be approximately 4 inches long after folding over) and attach to the hanger and twist. Add a pick to the end and attach to the arrangement.
- Continue the steps above to prep each ornament and add to your arrangement. I like to use ornaments with a variety of sizes and textures. Note: Group smaller ornaments for more impact.
- For even more dimension, I added loops of gold and silver ribbon in the arrangement. To adhere the ribbon, pinch the base, add a pick and then hot glue before pushing into the Styrofoam.
- Lastly, I added a few stems of gold fern leaves.
- Before you put your tools away, give it one last look all around to ensure there are no empty spaces.
Designer Christmas Table Centerpiece Tutorial Video…
I hope you enjoyed this Designer Christmas Table Centerpiece tutorial! This would be a great arrangement for a wedding or can be left up all season long as a winter centerpiece by leaving off the ornaments.
If you would like to learn more about wreath making, join my Wreath Making Club.
Don’t forget to join me on Facebook Live, for my other DIY tutorials. Even better, join our messenger bot HERE and we’ll send you a message on Facebook the next time we go live. It’s always more fun to join in on the conversation.
Happy Wreathing,
Julie
If you enjoyed this post, you might also like:
Stocking Stuffer Ideas for Crafters Under $10
DIY Christmas Potpourri Wreath
How to Trick Your Husband into Thinking You Spend Less on Crafts
Beautiful! But I don’t think I’ve seen anything you’ve made that isn’t! You den looks so pretty! Now enjoy!
Love it . Watch you often.
Beautiful … sent to myself n my 2 nieces (hope its ok to ‘share’)