How to Add Ribbon to a Christmas Tree
Y’all, I can’t wait to show you how to add ribbon to your Christmas tree so it looks full, flowy, and professional without spending hours trying to get it perfect.
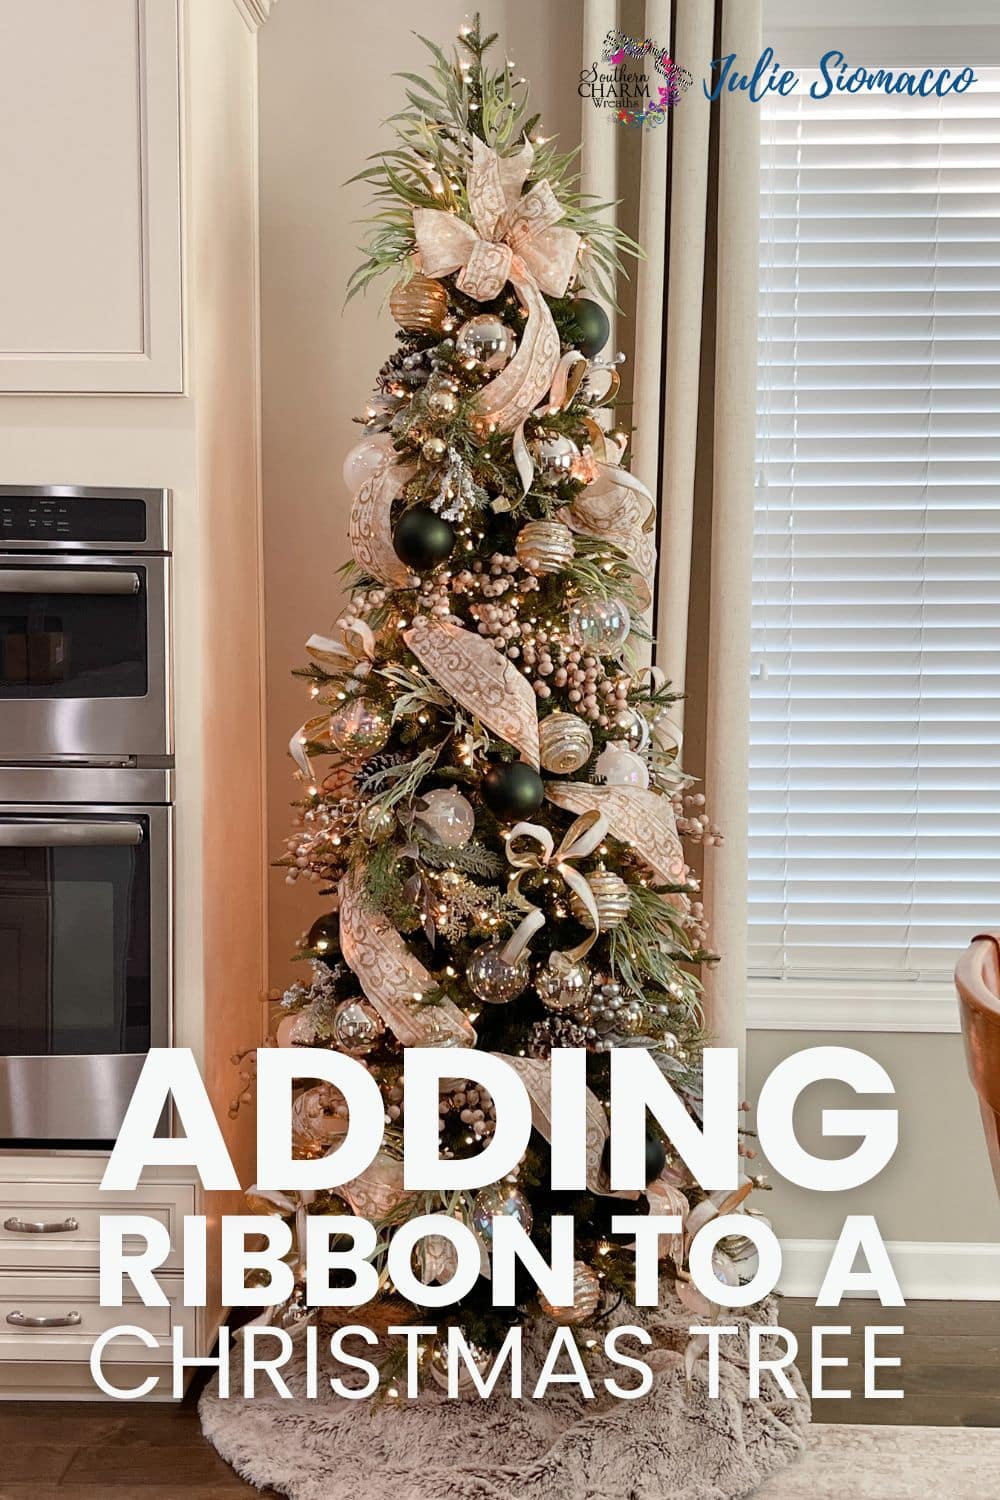
In this tutorial, I’m decorating my 6.5-foot pencil Christmas tree, but this same technique works beautifully on 7-foot and 9-foot trees too. You’ll see how I use two coordinating ribbons to create a soft, layered look that drapes naturally through the branches.
If you’ve ever struggled with ribbon looking stiff or uneven, this method will change everything. Let’s get started!
Why Decorate a Tree with Ribbon?
Ribbon isn’t just a decoration; it’s a design tool. Here’s why it’s a must-have:
- Adds visual flow: Ribbon creates movement, drawing the eye around the tree.
- Enhances the theme: With so many ribbon styles—classic satin, bold plaids, shimmering metallics—it’s easy to match your ribbon to your theme.
- Fills gaps: Strategically placed ribbon helps fill empty spaces, making your tree look fuller and more balanced.
Supplies You’ll Need
- 1 roll of 4-inch wired ribbon (main pattern or solid)
- 1 roll of 2.5-inch coordinating wired ribbon
- Scissors
- Step ladder (for reaching the top)
- Christmas tree (any size)
- Built-in branches or needle ties (for attaching ribbon)
- Optional: Floral wire
Tip: Use wired ribbon. It holds shape beautifully and makes it easy to create loops and movement throughout your tree.
Step-by-Step Instructions to Adding Ribbon to a Christmas Tree
Step 1: Dovetail and Layer Your Ribbon
Start by dovetailing the ends of both ribbons. This gives them a polished finish and keeps the edges from fraying.
Lay your two ribbons on top of each other. Place the 2.5-inch ribbon right down the center of your 4-inch ribbon.
Unroll a few feet onto the floor or your table, then pinch the two ribbons together about 8 inches down from the top. No need to measure exactly. Eyeballing works just fine!
Step 2: Make Your Bow for the Top
Using the layered ribbons, make a simple bow right at the top section.
Each loop should be about 6 inches wide, but again, don’t stress about perfection. Hold the loops up and make sure they look balanced.
If you prefer, you can tie the bow with floral wire, but I usually just attach it straight to the tree.
Tip: Skip the very top tip of the tree. Instead, place your bow about 12 inches down for a more natural, designer look.
Step 3: Attach and Fluff
Use the needle ties on your tree (or small branch tips) to secure the bow in place.
Then separate your loops slightly. Move one ribbon loop to the left and the other to the right so they layer nicely. This gives your tree top some texture without looking overdone.
If your ribbons have different stiffness, that’s totally fine. The contrast actually adds depth.
Step 4: Follow the Ribbon’s Natural Flow
Now it’s time to bring that ribbon down through the tree.
Here’s my rule: follow the ribbon’s lead. If it naturally curves in a certain direction, go with it. I tuck and poof the ribbon as I go, using the tree branches to hold it in place.
Think of your ribbon like a waterfall. It shouldn’t be tight or flat. You want soft loops and movement.
Tip: Don’t worry about exact spacing or perfect loops. Once your ornaments and picks are added, no one will notice minor unevenness.
Step 5: Layer and Repeat
Keep working around your tree, alternating directions with your ribbon tails.
For example, if your first ribbon section flows to the left, make the next one flow to the right. This creates visual balance and keeps the design interesting.
When you reach the end of your ribbon section, cut diagonally and later dovetail those ends for a clean finish.
Then start fresh with another set of layered ribbons and continue until your tree feels complete.
Tip: Attach ribbon about midway into the tree, not just on the surface. This gives your design depth and dimension.
Step 6: Fluff and Fill
Once all your ribbon is in place, step back and check your spacing.
You might see small gaps. Don’t worry! You can adjust by gently tugging the loops or adding a small extra piece of ribbon tucked in with greenery.
If you can see a branch tie or wire showing, just cover it with an ornament or a floral pick later on. Easy fix!
Step 7: Enjoy Your Designer Look 🎄
That’s it, y’all! You now know how to add ribbon to a Christmas tree the easy way and create a designer look without all the stress.
Whether you’re decorating a pencil tree, a full evergreen, or even a flocked beauty, this ribbon method works for all of them.
So go have fun with it and remember, it doesn’t have to be perfect to be beautiful.
Pro Tips for Adding Ribbon
- Work with Smaller Pieces: Cutting the ribbon into manageable strips makes it easier to achieve a professional look.
- Don’t Overthink It: Ribbon doesn’t have to be perfect! Sometimes a slightly messy, natural look adds to the charm.
- Mix and Match Textures: Combining velvet, metallics, and plaids can elevate your tree’s look.
- Step Back Frequently: View your tree from a distance to ensure everything looks balanced.
Want to Master Christmas Tree Decorating?
Adding ribbon is just one piece of the puzzle when it comes to decorating your tree. If you’re ready to take your tree to the next level, join my Christmas Tree Decorating Masterclass! In this self-paced course, you’ll learn:
- How to choose and layer ribbons like a pro
- Insider tips for creating balanced, stunning trees
- Techniques for adding florals, ornaments, and more

Transform your tree into a masterpiece you’ll be proud of. Sign up today for lifetime access to all the tools and tips you need!
Love your pencil tree! Can you share where you bought it? My balsam hill fir tree is too much for me now. Thanks
Absolutely beautiful! I have ribboned my tree the past two years, but I am going to use some of your tips and make it better this year.
Where did you get your tree? I love the glittery, twinkling effect.
Thank you for sharing your talent and skills!