How to Quickly Make Your Etsy Shop Photos Stand Out
I want to give you some photo tips on how to quickly make your Etsy Shop Photos stand out. Having stellar photos is one of the key elements to having a buyer click on your Etsy items. This post contains some affiliate links for your convenience. Click here to read my full disclosure policy.
How to Quickly Make Your Etsy Shop Photos Stand Out
I am not a professional photographer, therefore; I do not use an expensive camera. I purchased a nice DSLR two years ago but it has too many buttons and gadgets for me to learn. I find that using my iPhone 5S camera for my Etsy shop photos works great! I make sure to wipe down the camera lens before I use it, because I tend to carry it around in my back pocket, point and shoot. Also do not use a flash unless you really know what you are doing when it comes to lighting. Me? Yea not so much experience, so therefore no flash. Besides, using a flash on sparkly things like glitter and metallic tends to mess up the photo.
[Tweet “Lighting Tips for Taking Etsy Photos”]
The biggest factor in taking great Etsy shop photos is to have great lighting! It is best to have indirect sunlight. So find a window in your home that has a lot of sun but make sure it’s not direct sun, so you can either wait until the early morning or early afternoon hours or even hang a white sheet over your window if you think it still has too much sun. I’ve seen others use white foam board to reflect the sunlight onto their product too.
However, waiting on mother nature does slow down the production process. Waiting for the sun to position perfectly in your window takes time and its easy to get distracted and forget. Wasted time, means wasted money! Once the perfect spot is found, the season will change and the sun shifts in the sky, so another location may be needed. Then of course rainy or overcast days will also hold up the process.
Use Great Lighting for Your Etsy Shop Photos
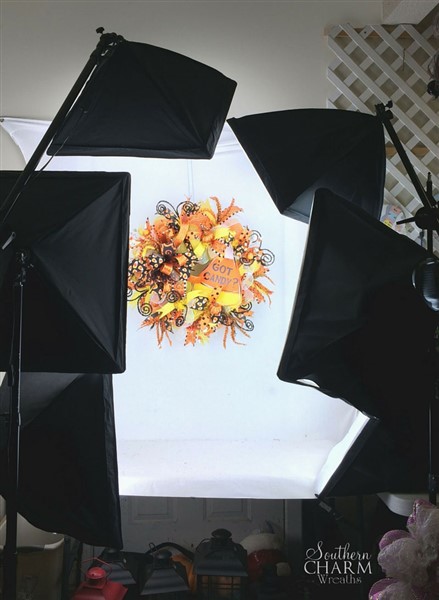
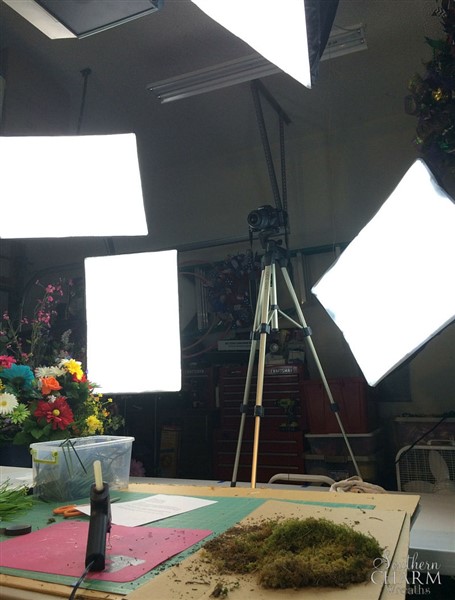
It didn’t take me long to realize that I needed to invest in professional photography lighting. Now I’m able to take pictures as soon as I finish making my product and I’m no longer a slave to mother nature. I love being able to take photos late at night which happens during the holiday rush or on rainy days. The lighting is great, saves me a lot of time and keeps my production moving. You can see from the photo below, I’m using 6 box lights surrounding my wreath (4 softbox lights and 2 boom lights) or two of these light kits by Fancierstudio on Amazon. I have one area in my workshop (see my wreath workshop set up here) that is dedicate to photography.
I also like that I can use the lights when making videos.
Using a Backdrop for Etsy Shop Photos
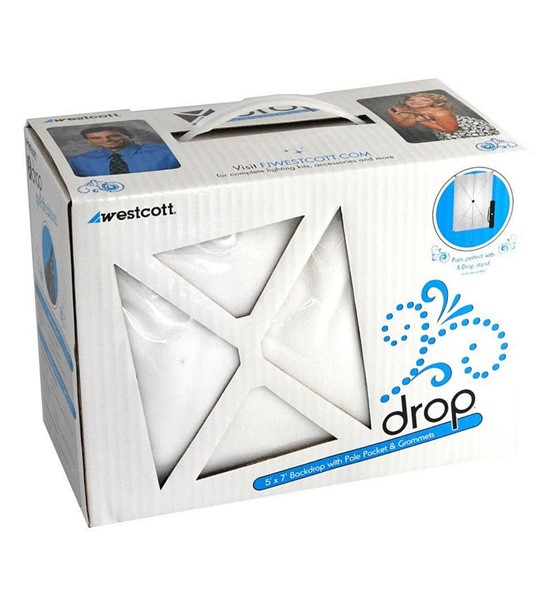
After many attempts at playing around with a background, I found a great backdrop to use to place behind my wreaths, the 5×7 Westcott 577. I like this backdrop because it is smooth and gives a consistent look. Plus it’s made of stretchable fabric that can be washed in the washing machine. Using this backdrop saves a lot of time editing photos. I attach it to my wall (remember I work out of my garage and don’t mind attaching hooks to my walls). If you can’t attach hooks, you could purchase the backdrop plus frame kit. Also, if your Etsy items are smaller, try using a small light box like this one.
Play around with your Etsy product photography to see which background you like best. Other background ideas you can try include:
- Painted pallets – I like this idea because you can typically find them for free. Just re-position the pallet slats to be closer together.
- Paneling – Use a piece of paneling purchased from your local hardware store as a backdrop. If you don’t like the colors, you can always paint it.
- Picnic Table – Turn a wooden picnic table on its side and use as a background for your Etsy shop photos.
- Wooden Fence – If you have one, hang your items or display them in front of it, but remember no direct sun and avoid shadows.
- A barn door – This would be a fantastic backdrop for your Etsy shop photos if you have one.
You can get creative with your backdrops but make sure your Etsy shop has a cohesive look. You want your Etsy shop photos to balance one another when you are looking at your shop as a whole. For more Etsy Shop Success, check out my ebook, Grow Your Etsy Sales
[Tweet “How to Use Batch Process to Quickly Edit Etsy Shop Photos”]
Quickly Edit Etsy Shop Photos Using Batch Process
Always take lots of pictures too, way more than you will need in case some turn out blurry. It’s best to get pictures of items both from a distance, staged and close up to show the details. Once pictures are made, upload them to a computer and use a program such as Corel Paintshop Pro X8 (click here for more info on Corel Paintshop Pro) to enhance them. With the Paintshop Pro batch process, one can edit, add watermarks and resize all the photos at the same time instead of each individual picture. This process goes even faster when there are several products to list. In my video below you can see how I use Paintshop Pro to batch edit my Etsy shop photos.
Of course you can always use Picmonkey.com which is free. If you need instructions for editing photos in Picmonkey, follow the instructions in my video here.
I hope you found my Etsy shop photo tips useful. Comment below and tell me what tips you have for making stellar Etsy shop photos!
Julie 🙂
If you enjoyed this, you might also like:
The New Etsy Shop Homepage – Are You Ready?
10 Proven Productivity Tips for Successful Etsy Shops
How to Beat the Competition on Etsy and Win
When to Make Seasonal and Holiday Crafts to Sell


OMG this will change my life! THANK YOU! One question, where do you get the Corell Paintshop program is is there a fee for it? If so, how much?
Again, Thank you, thank you, thank you! As always, you are the BEST!
If you click on the name it takes you to Amazon. Here is the link http://amzn.to/29QibnK
Julie, the photo tips are great. Thank you so much! You are always so helpful. I have a question. Do you suggest not taking a photo on a white door? That’s just the most convenient place I have and it’s also right across from a huge bow window in that room… So the lighting is usually good. Thanks again !
You’re the best!!!
Yes, you can take photos on a white door. The door I have under my backdrop is white. But I still had to edit the photos for my personal preference, then I found the backdrop.
Great tips and thank you for sharing your tips and knowledge. What kind of background to you recommend for white items? Red or black or some other color? Thanks
For white items, I would recommend a wood grain or gray background.
I make jewelry as ell as wreaths and wonder what kind of lighting I would need for small items.l Thank you oodles for all your wonderful knowledge and tips. I always learn form you.
Great information Julie. You are so generous and kind. Many, many blessings to you and your family. I have been making some serious rookie mistakes. I paid a lot of money for information you make clear and simple. May the Lord richly bless you!
Oh gosh my dream is to get your lighting set up. I struggle with taking good photos and I although I try hard to get natural light if I can, just consistent quality lighting makes a word of difference. Love your suggestion about using a piece of paneling for a backdrop! Great post.
Thank you so very much once again for your help and insight. Any crafters reading this I highly recommend Julie’s success circle group if you want to grow your business. Amazing group with even better advice and help. Well worth every penny it costs if you want to build your business.
Julie, I thank God for putting you in my path on my journey to start my own business doing what I love! I can not thank you enough for all that you are teaching me!! May God richly bless you and your business as he blesses me through you!!!
Rhonda Carrier
Aw, thank you so much!
HELP! Question! I sell wreaths and have created my own light box. I’m just torn between the white background which is super clean, consistent, pretty and actually showing my products in use. I’ve read many things stating you do better if you show it in use. In this example, a front door. I know that weather or time of day can mess with our ability to take photos, but has anyone noticed a difference between whether having a white background or door in wreath pictures makes a difference. I’m just getting so many people saying wow your pictures are so great, but your pieces are even more beautiful in person and I don’t think I’m capturing my pieces as good as I can.
It depends on where you are displaying the photos. As I teach in my inner circle, they perform better on Pinterest and Facebook if you display them in use, however they tend to perform better on Etsy if they pop off the page, which is with a white or light colored background.
Hi, Julie,
This is wonderful information to know. Etsy is my main focus for now and I can understand how you mean they would do better on white or light background there since the product is more the focus instead of what’s going on in the backdrop. Also on Pinterest most all of the pictures I see are in action, showing a fancy home, door, etc. Good to know for Facebook though – that one was more of a toss up for me in terms of understanding what works best there. Any advise on leveraging social media sites to drive more traffic to your Etsy shop. I’ve researched SEO so much, but not having much luck with it so looking for other outlets. Thanks so much for all of your help!
Hi Julie,
I just tried Pic Monkey and I love it. However, apparently it’s not free anymore. When I try to save my photo, it takes me to the free trial for seven days. Then it ask me to click on the amount to pay each month. 🙁
this is great information Julia,I’m trying this for my next listing on Etsy. Thank you
I am so confused. How do I upload my photoes from my iphone to the computer without emailing them to myself and than saving them in a file.
If I take a picture with my iphone do I just add it to my etsy shop from my phone or move it to my computer first?
I just listened to your video on Etsy 101, but still not sure how to get good quality pictures without buying expensive lighting.
thanks so much
Diana
You can upload them directly from your phone. Take the picture in square format. If you upload to your computer, use the usb cable that came with your iphone to charge it but plug it into your computer. Then click on the files and change the drive to read from your phone instead of the computer.