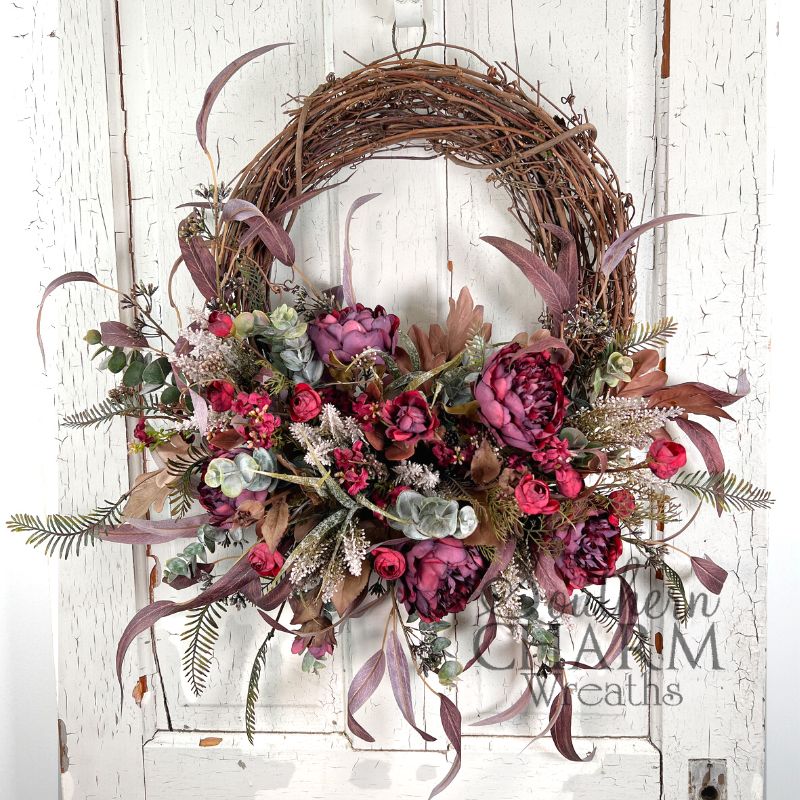
Faux Peony Fall Wreath
Ready to make a beautiful burgundy fall design? Today I am showing you just how to make a beautiful faux peony fall wreath. This Fall silk Peony flower wreath uses only florals and guess what, no sign of ribbon anywhere! We have partnered with Greenery Market to put together this beautiful burgundy Fall design. Come check it out.

How to Make Faux Peony Fall Grapevine Wreath
We are entering Peony paradise with this gorgeous faux Peony Fall grapevine wreath design. Greenery Market has put together a stunning wreath kit. It includes gorgeous Eucalyptus blades and sprays, a fuzzy wheat Astilbe bundle, and burgundy Peony bundles. You will agree that these complement each other so well.
The Peonies have a realistic dry flower look that you can see and touch. You would never guess that they were faux flowers! The silvery green Eucalyptus stems brighten up the burgundy palate. With a touch of burgundy color that adds more dimension and compliments the florals.
Color is the most important element in any design. This one does not disappoint! A good rule to remember is to look at your color wheel and use colors that complement each other. The burgundy color palate that is dominant in this Fall Peony wreath is elevated with the different silvery green with burgundy touches on the Eucalyptus. Can we just admire how much the Astilbe bundle adds a touch of brightness to break up the burgundy color throughout.
Each floral and greenery element adds so much texture and dimension to this wreath design. It’s a showstopper for sure and a great way to welcome in the Fall Season!
This post may contain affiliate links for your convenience. Click here to read my full disclosure policy.

Supplies for this project:
Interested in shopping for supplies for this project? Be sure to check them all out at Greenery Market.
- 1 – Burgundy Peony Bundles
- 2 – Blade Eucalyptus Spray
- 1 – Fuzzy Wheat Astilbe Bundle
- 3 – Eucalyptus Pick
- 16″ Grapevine Wreath Base
- Glue Pan
- Florist Wire
- Wire Cutters
- Rustic Wire
How to Make a Faux Peony Fall Grapevine Wreath
1. Build Your Wreath Foundation
Start by using a 16” grapevine wreath base. Take each of your different floral sprays and bushes and position and fluff each stem and leaves. Bring them to life before you add them to your wreath. Start with the blade Eucalyptus spray. Cut about 4” down from the stems to get rid of the extra length. Dip the end of the stem in hot glue and add the blade Eucalyptus on the bottom left side. Adjust the stem to follow up the left side. Use bind wire if you need to loosely attach the top of the stem to keep it from shooting out too far.
Add a second blade Eucalyptus spray, using hot glue on the stem, just to the right of the previous. Causing the stems overlap slightly. This creates a binding point where all the florals will come out of. If there are any stems coming out too long, feel free to trim them with wire cutters and re-glue them closer to the wreath.
2. Add Your Peonies
Take your Peony bundles and trim off the Peony flowers making sure to leave a stem long enough to add into your wreath. Don’t forget to put a little bend and shape into each Peony stem to make them look more realistic. Dip the end of a Peony in hot glue. Add into the bottom of your base, so the flower is a few inches above the base. Add a second Peony flower at the binding point along the bottom. If you need to create a longer stem, or if your grapevine wreath base is very loose, you can add a wooden floral pick to the bottom and attach it by wrapping wire around to secure. Cover the wire with floral tape making sure to pull the tape as you wrap to activate the stickiness. Add a third Peony flower on the lower right side. Keep your spacing between each flower.
Continue adding Peony flowers on the lower left and right side, originating from the binding point you created in your wreath foundation. Cover any exposed hot glue with Spanish moss. Once you have all five Peony flowers in, bend the stems. This is to adjust and maintain good spacing throughout the wreath design.
3. Fill in Your Design with More Florals
Grab some stems with burgundy buds and leaves from your Peony bundles and trim extra stems and into smaller picks. Dip the ends in hot glue and fill in between your Peony flowers on the lower right and left side. This will fill in the open spaces between the big Peony flowers.
Take your Ranunculus stems and flowers and separate them into smaller stems with a few flowers each. Add some shape by twisting and bending their stems. Add a few small Ranunculus stems into the bottom of your wreath base having some go up the right and some up the left side of your design, using the foundation from the beginning as your guide. Use hot glue to secure each stem into the base.
4. Add in Your Eucalyptus and Filler Flowers
Grab your Eucalyptus picks and tear them into individual stems. Trim the extra length from the bottom. Let’s add some beautiful, silvery green Eucalyptus stems into your wreath by dipping the ends in hot glue. Start adding Eucalyptus throughout your wreath design to break up the burgundy Peonies and Ranunculus.
Take your burgundy floral bush and trim it into separate smaller stems and trim off the extra stem length. Dip the ends in hot glue and add a few stems dispersed throughout your design, keeping in mind balance while you add them in. Fill in any holes you may see or any places where your design may need shaping. Use short and longer stems throughout to keep adding dimension. Don’t forget to cover any hot glue you see with Spanish moss.
Let’s add our airy Fern stems and trim them into a few separate stems. Shape them to give them motion and trim any extra stem length. Add a few Fern stems throughout your design to add another texture which will add more interest to your wreath.
5. Brighten Up Your Wreath with Astilbe
Take your fuzzy wheat Astilbe bundle and trim the extra stem length off. Separate some of the flocked grass stems from the bundle and add into your wreath design using hot glue. Keep in mind balance when you are adding these new stems. Divide the fuzzy Astilbe into two stems and trim off the extra stem. Dip the ends in hot glue and add into the center of your florals. Add a few more Astilbe stems throughout your floral design to brighten up the wreath.
Finish off your wreath design by using any leaves that you have trimmed from the Peony bundles to fill in any holes that you may see. Add them using hot glue to secure them. Make any final adjustments or re-position any floral stems necessary. Enjoy your beautiful Fall Peony Wreath!
Watch the video: How to Make Faux Peony Fall Grapevine Wreath
If you enjoyed this post, you might also like:
- DIY Designer Fall Wreath on Straw Base
- How to Make a Fall Lantern Swag
- DIY Designer Fall Wreath on Straw Base
Like this post? Pin it for later!


Absolutely gorgeous!! You make it look so easy Julie. Can’t wait until I can work with the ease that you do!!
Beautiful job as always!