How to Make a St Patrick’s Day Wreath for Your Front Door
Is it spring yet?? No? Well, truth be told, I don’t really care. Valentine’s Day is over so I’m putting up the St Patrick’s Day decor and declaring it officially spring (on my front porch anyway)! If you want to get the same look, keep reading or watch the video below, and I’ll teach you exactly how I made this St Patrick’s Day wreath!
This post may contain affiliate links for your convenience. Click here to read my full disclosure policy.
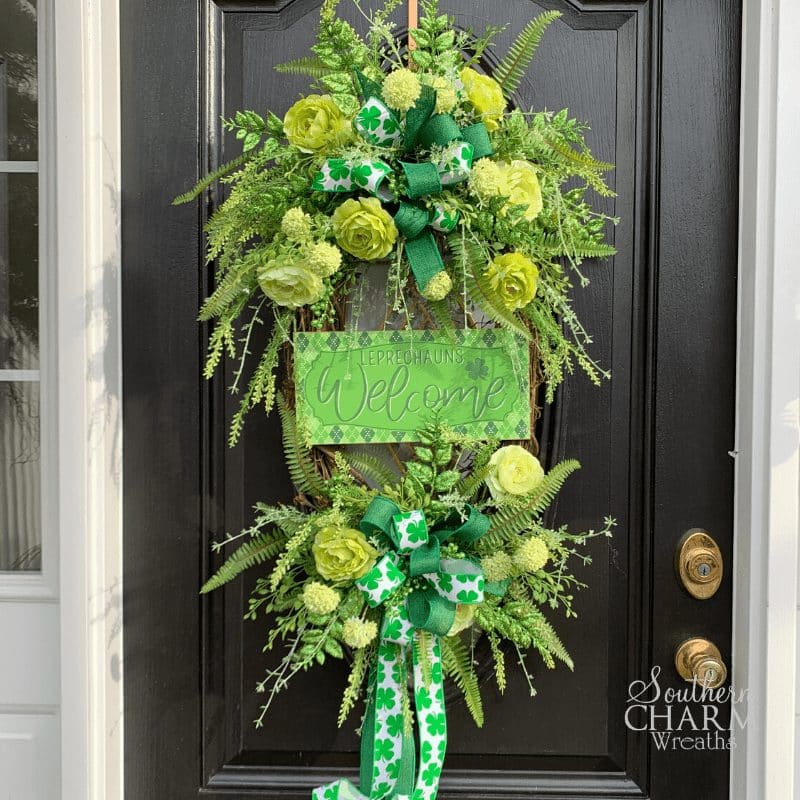
I ‘m loving all the textures and shades of green that really make this wreath pop. And of course, you know I love making bows! So this wreath features two of them!
Let’s get started!
Supplies for Your St. Patty Wreath
16″ Oval Grapevine Wreath
St. Patrick’s Day sign
1.5″ Shamrock Ribbon
1.5″ Green ribbon
1 Mixed Greenery Bush
1 Best Fern Bush Ever
1 Green Ranunculus Bush
2 Green Glitter Stems
1 Cream Allium Bush
All of the floral supplies (and the sign) for this wreath came from TrendzandGemz on Etsy. They are one of my favorite floral supply shops and I use them for a good portion of my projects. I highly recommend them! Find the supplies for this project here!
You’ll also need:
Floral wire
Wire cutters
Hot glue pan
Hot glue
Steps for Making the St Patrick’s Day Wreath
Step 1 – First, you’ll need to attach your sign to the wreath base. You can do this easily by stapling floral wire to the back of the sign near the corners, and then twisting the wire around the wreath base.
Step 2 – Next you’ll make your two bows. You can make yours however you like. Mine were three 12” loops of the green ribbon, and four 12” loops of the shamrock ribbon. Then I added one more loop of the green to go right in the front. I also left long tails on the bow that will go on the bottom of the wreath. Use floral wire to attach both bows, one on the top center and one on the bottom center.
Step 3 – Now you’ll add in your greenery and silk flowers. Use hot-glue to attach several stems of the greenery and ferns around each bow until you have a good base layer for your floral elements. Then add a few of the green ranunculus to brighten up the whole arrangement. Next, you’ll use the glitter stems and pom poms (allium) to give it more volume and texture.
And that’s all there is to it!
Tip: One thing I always like to do that gives the greenery a more natural feel is to bend the stems a bit before I add them to the wreath. Watch the video to see what I mean.
How to Make the St Patrick’s Day Wreath
If you enjoyed this and want to learn to wreath the professional way, join me in our exclusive Wreath Making of the Month Club!

Happy Wreathing,
Julie
If you enjoyed this post, you might also like:
St Patrick’s Day Clover Wreath
How to Make a Simple Spring Wreath Bow
How to Make a Spring Tulip Wreath
Liked this St Patrick’s Day Wreath? Pin it for later!

Hi Julie
A quick question ~ do we need to use the pick machine? If not how should we attach the greenery and floral?
Thanks for all your tutorials. You’re the bomb!! 🙂
Use a wooden floral pick which I demo at the beginning with the first greenery I attach
Absolutely beautiful. Julie, you are the daughter of a very Dear Friend of mine that I met at Ascension.
That has to be Beverly?