Review: How to Use the EZ Bow Maker
If you struggle hand tying a bow, you might want to try the EZ Bow Maker. I pulled it out of the box and immediately started making professional bows to use in your wreaths or decor. Today we’re going to play with the EZ Bow Maker to learn how to make bows!
This post may contain affiliate links for your convenience. Click here to read my full disclosure policy.
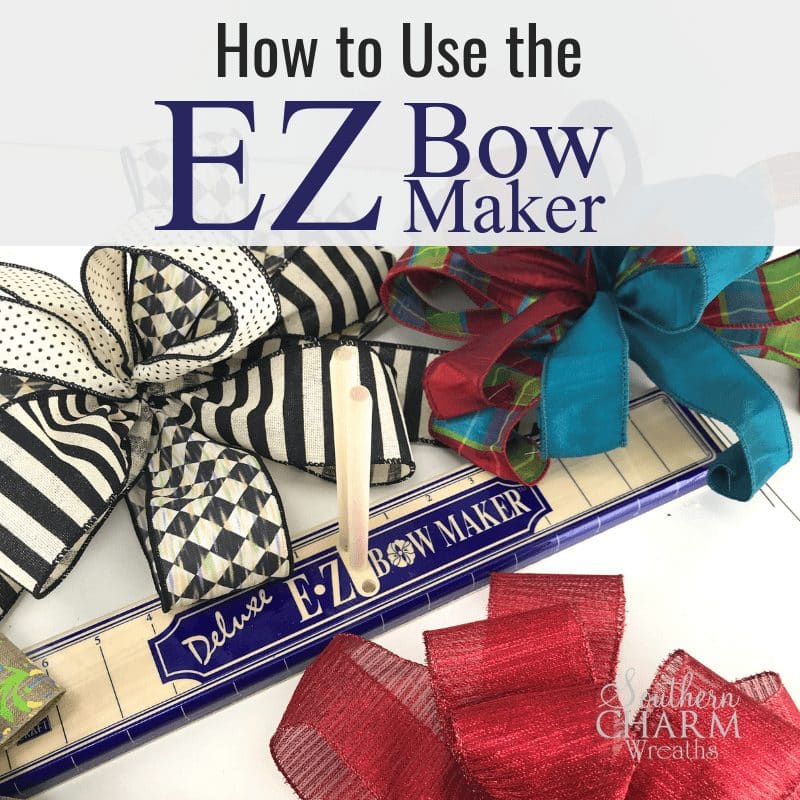
Making bows is easy with the EZ Bow Maker! I’ll show you how to use it to make fun easy bows for your home projects.
[Tweet “Ways to use the EZ Bow Maker for Wreath Bows”]
Supplies
EZ Bow Maker
Hammer or rubber mallet
Wired ribbon
Wire
Scissors
Wire Cutters
Hot Glue Pan
Glue Sticks
Steps for Using the EZ Bow Maker for Easy Bows
Step 1 – Setup EZ Bow Maker
Begin by setting up your EZ Bow Maker. Follow the instructions to hammer in the wooden dowels with a hammer or rubber mallet.
Step 2 – Make Bow Option 1
Unroll approximately 7 yards of wired ribbon. Then place a piece of wire across the EZ Bow Maker next to the middle wooden dowel.
Measure out an 8-inch tail and lay the ribbon on the EZ Bow Maker. Then measure out 5 inches for a loop and bring it back between the dowels while twisting the ribbon. Next measure out a loop on the other side and once again bring it back between the dowels and twist.
Once you have three 5 inch loops on each side, make four 4 inch loops on each side, once again twisting as you bring it back between the dowels.
Next, bring the wire to the front and lift the bow out of the bow maker.
Fluff and shape the bow loops and then twist the wire to tighten in the back.
Step 3 – Make Bow Option 2 (Funky Bow)
Measure and cut 30-32 inch ribbon strips.
Place piece of wire through the center of the EZ Bow Maker.
Lay out one ribbon strip through the center dowel, measure out 6 inches on one side to make a loop and twist through center dowel. Do the same with the next piece of ribbon on the other side.
Continue making ribbon loops with each ribbon strip rotating side to side. I used two of each style of ribbon, using the wider ribbon first, then finishing with the 1.5-inch wide ribbon.
Next, bring the wire to the front and lift the bow out of the bow maker.
Fluff and shape the bow loops and then twist the wire to tighten in the back.
Step 4 – Make Bow Option 3 (Mardi Gras Ribbon)
Thread a piece of wire through the center of the EZ Bow Maker.
Start with widest ribbon and thread through the middle dowel, making an 8-inch bow loop on one side. Thread back through the middle, twisting as you go, and make an 8-inch loop on the other side. Continue until you have three loops on each side.
Next, change ribbons to one more narrow (I used gold) and make 6-inch loops as you go, following the same process as above.
Finish by using your narrowest ribbon (for mine it was purple) and make 4-inch loops as you go.
Next, bring the wire to the front and lift the bow out of the bow maker.
Fluff and shape the bow loops and then twist the wire to tighten in the back.
Step 5– Finishing Touches
To make any of your bows extra special, hot glue picks that fit your colors or theme between or inside bow loops.
Watch the video for making Wreath Bows with the EZ Bow Maker
As you can see there are many different styles of bows you can make with the EZ Bow Maker. This tool should be especially helpful for those who find it difficult to hold the ribbon tightly in your hand while making your bow. Learn to hand tie more bows in this free video here.
Let me know if you enjoyed this and don’t forget to join me on Facebook so you can watch me Live!
If you enjoy watching me and/or learning to make wreaths of various styles, join me in my Wreath Making of the Month Club, learn more here.

If you found this tutorial useful, please share it now.
Happy Wreathing,
Julie
If you enjoyed this post, you might also like:
How to Make a Simple Spring Wreath Bow
Transfer Print to Chalkboard Ribbon
How to Make a Bow with Multiple Ribbons
Hi, Can I use mesh ribbon to make bows?
Yes, but it’s a little trickier. Wired ribbon def works best if your newbie to bow making.
Where is the video ? All I got were instructions on how to make one ?
In the bottom of this post.
Hi, I have a lot of regular ribbon could I use it on making bows?
Wired is best
Dora it’s really not easy to use unwired ribbon to make bows. When you have wired ribbon you can manipulate the loop to do exactly what you want it to do or go exactly where you want it to go. When it’s not wired the loops just fall where they may.
Hope this helps.
Denita Atkinson
Does Hobby Lobby keep the EZ now maker in stock?
Thank hoj
I’m not sure.
Yes usually they do.
Hi! I sent for the free video on making 9 bows and when I received the email I scrolled through them (they are really nice!) and then added them to my favorites to be able to refer to them later. When I went to the favorites section, the heading of “making 9 bows” shows up and when clicked, will go right back to your initial menu, where it wants me to send for the free video once more. Have I done something wrong? Any suggestions would be greatly appreciated. Thanks!
You may have saved the wrong link. You can submit for them again and it will be emailed to you again. Save the email also.
I got my first one years ago…can’t even remember how long but it came with a vhs tape for instruction!! Works great, bit of a learning curve, you can make huge bows on it! Once you get the hang of it you can add flowers, greenery, tinsel, etc. , it’s well worth the cost.
Hello, I just watched your video on using the EZ Bowmaker and it was very inspiring! I’ve had one for several years and haven’t ever used it, but since watching your video, can’t wait to try making some bows! Your bows are beautiful, I’ve always wondered how to make a “funky bow”, now I know!! Than you for sharing
Thank you for this video. I have had the bow maker for years but have not used it in SO long!! Great refresher!
Thank you for sharing your video.Very helpful.Love your different bows
I want to use two ribbons. Do you have a video that shows how?
Thank you,
Judy
I have the EZ Bow Maker, but here are no instructions on how to correctly set up the dowels. Do you mind to share that with me?
What are you using to keep the hot glue in? I’ve never seen one of those before. All the bows were stunning btw!
Julie uses an electric skillet to make a glue pan. Here is her affiliate link to purchase: https://amzn.to/32Qa4Qv
What is the small Dowel for? I dont see any video’s explaining what the Dowels do or are for I dont have my instructions. I bought a used one at the Thrift Store no instructions or explainations.
Thank You
Constantina
They hold the ribbon. I don’t use one of the dowels, two in middle beside each other and another on the end to hold the ribbon bolt.