Deco Mesh Pumpkin Wreath
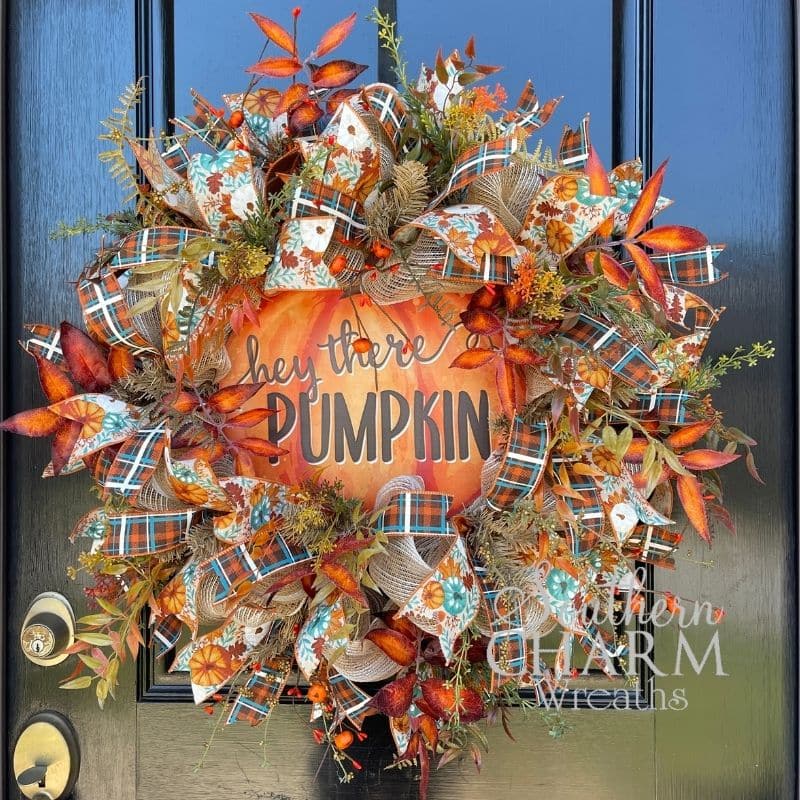
If you haven’t worked with deco mesh yet, let me show you how easy it can be! You can incorporate ribbon and greenery to create whimsy and texture. Come discover with me how easy it is to make your own mesh pumpkin wreath!

How To Make A Deco Mesh Pumpkin Wreath
Most of today’s supplies come from a Trendy Tree Kit that I ordered. It came with a neutral work wreath, greenery, ribbon, and deco-mesh to start this beautiful Fall wreath. These kits are a great way to simplify shopping for a big project. Feel free to add any ribbon or greenery from your own personal stash. Combining the two is a great way to personalize projects with your own signature style. I love using Trendy Tree Kits.
This deco mesh kit is a nice neutral color palette that is not exclusively for Fall. You can use it for Spring, Easter, or even Christmas with the right embellishments and finishing touches. It is so versatile and can be adjusted for almost any seasonal décor.
For this Fall, you will wow people with the bright colors and textures of this wreath. The vibrant orange leaves and metal pumpkin sign are perfect for a festive fall wreath. I love how the Fall patterned ribbon ties the colors all together. Don’t be afraid to start creating your own wreath! The more you practice and create the better you’ll get. Let’s get started!
This post may contain affiliate links for your convenience. Click here to read my full disclosure policy.

Supplies for This Project:
- 10.5” Tan and White striped Deco-mesh
- 15” Burlap colored Work Wreath Base
- Hey There Pumpkin Sign
- Pumpkin and Berry Spray
- Fall Greenery Bush
- Orange Fall Leaves Bush
- 2.5” Fall Floral Ribbon Roll
- 1.5” Fall Plaid Ribbon Roll
- Pipe Cleaner
- Gluepot with Hot Glue
- Florist Wire
- Scissors
- Wire Cutters
- Metal Punch
- Wood Easel (Optional)
How to Make A Deco Mesh Wreath: Step-By-Step Tutorial
1. Prep Your Materials
Take your Fall greenery bush and separate it into 9 individual bunches with your wire cutters. Pull apart your pumpkin and berry spray into 4 separate pieces. Measure and cut 14” strips of the ribbon and dovetail each of the ends. You want enough to place in each set of ties. Do not forget to separate and fluff the pine tines on your work base also.
2. Add the Deco-Mesh
Start with the end of your mesh roll and secure it into the inner ring of your work wreath by twisting it into your pine tines. Measure 10” loops and attach the mesh to the next set of ties. Curl the sides under to hide your edge and poof the loops as you go. Continue throughout the inner ring of your work wreath.
Once you’ve completed the inner ring, carry on making the 10” loops throughout the outer ring. Twisting in place with your ties. Fluffing the loops as you go. Once you’ve reached the last loop on the outer ring, add a third ring of 10” loops in between. Secure with the outer ring pine tines. Cut the end of the mesh and tuck it under a loop.
3. Add Your Ribbon Streamers
Layer a plaid ribbon on top of the floral ribbon tail and fold it in half to find the center. Pinch the center and add into your work wreath pine tines. Adjust the streamers to be in an “X” pattern. Repeat this process to add streamers into each set of ties. Adding the streamers adds another layer of texture and color!
4. Attach Your “Hey There Pumpkin” Sign
Use your metal punch to create a small hole on the top, bottom, and each side of your metal sign. Feed a wire into the bottom hole and use it to attach it to the work wreath base. Twist the wire to secure your sign. Do the same to attach through the top of the metal sign onto your wreath base. Attach each side with wire as well. Clip excess wire in the back. Pull the mesh loops out from under the sign so they are fluffed. Twist a strong pipe cleaner to the back of your wreath base for a hanger.
5. Let’s Add Some Greenery
If you have one, hang your wreath on an easel so you can see how everything will look. Separate your greenery into 9 different pieces. We are going to work on the outer ring and dip the end of your greenery to add to every other set of ties. Work your way around the inner ring and hot glue the stem into the pine tines, evenly spacing the remaining greenery you have.
Now it’s time to add your pumpkin and berry spray. Start with the outer ring, finding pine tines that don’t already have greenery. Work your way around the wreath to fill in any spots you think need a touch of pumpkin and berries. Cut your orange fall leaves bush into smaller stems and hot glue one on the top right of the sign. Add a second on the left and one towards the bottom and top of the sign.
6. Final Touches
Continue adding more orange fall leaf stems around the wreath base in various spots. The bright fall colors of the leaves tie in well with your pumpkin sign. Fluff or adjust any ribbons and greenery that may have been flattened. Enjoy your beautiful Fall wreath!
Watch The Video: How To Make A Deco Mesh Pumpkin Wreath
If you enjoyed this post, you might also like:
- DIY Designer Fall Wreath on Straw Base
- DIY Fall Sunflower Pumpkin Basket
- How To Make A Fall Pumpkin Door Hanger With A Bow (Video)
Like this post? Pin it for later!


Hello
I love your wreaths and I just received your lemon welcome kits. Can you tell me if you have Halloween and fall wreaths kits ?
Thank You
Valrie
Hey Valerie – We do not sell wreath kits or any supplies. We have partnered with some of our favorite vendors though to create kits for our wreath club members.