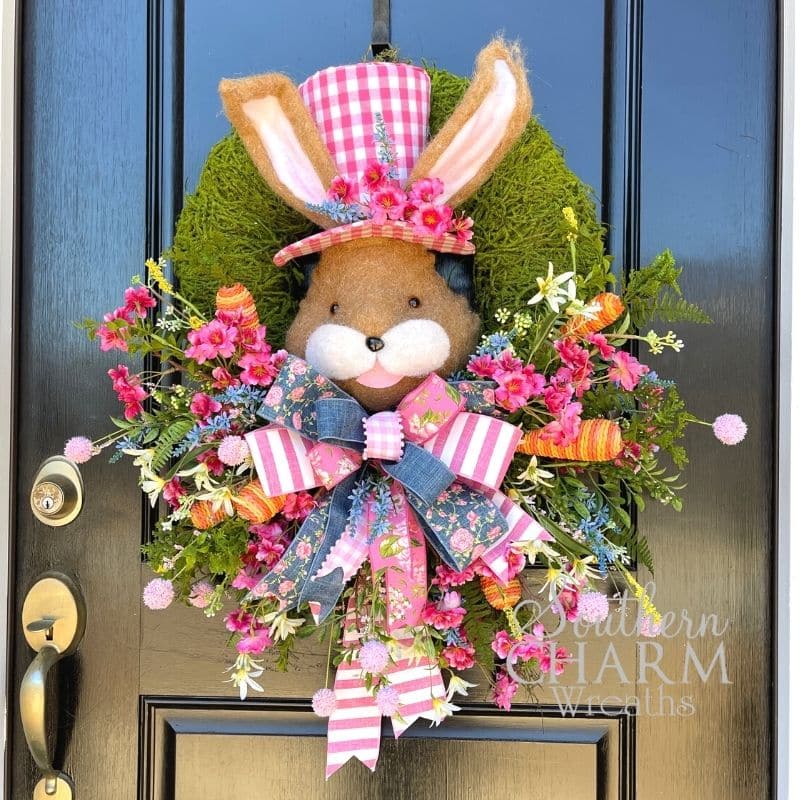
Easter Bunny Wreath On Moss Base
Make a playful and cute Easter bunny wreath on a moss base. Everything about this wreath celebrates spring and adds whimsical charm to your front door.
This post may contain affiliate links for your convenience. Click here to read my full disclosure policy.

Don’t you just love this adorable fuzzy face? I can’t help but smile when I look at him with his pink checkered hat. This wreath is bursting with fun decorations and spring florals. The best part about it is how easy it is to make.
I didn’t cover up the moss base because all that green just screams, “Spring is here!” The pink and purple flowers really pop against the green background too. Honestly, green moss wreath bases are the best ones to use for an Easter wreath with bunny face, don’t ya think?
Supplies For An Moss Easter Bunny Wreath
- Oval Moss Wreath
- Large Easter Bunny
- Pre-Made Multi-Ribbon Bow
- Fern Picks
- Nandina Greenery
- Cherry Blossoms
- Carrot Picks
- Zip-Ties
- Moss
- Floral Pins
- Floral Wire
- Wooden Pick
- Hot Glue Pan
- Hot Glue
How To Make An Easter Bunny Moss Wreath
1. Attach The Easter Bunny
I did this step ahead of time, so you won’t see me attach it in the video. The Easter bunny I used is so big that I placed it right in the middle of the wreath. If you are using a smaller bunny, then you can put it on the side or top.
2. Add The Bow
I also pre-made a multi-ribbon bow before I recorded the video. I like to make bows ahead of time because it saves me time when I make the wreaths.
Since this is a moss wreath, you will need to first wrap the florist wire from the bow around a floral pick. Then, stick that pick into the wreath.
I put it at the bottom of the Easter bunny, so it looks like he has a really big bow tie!
3. Insert Greenery
I chose fern and nandina greenery because they are darker green shades than the moss base. It adds visual interest to the wreath.
As you add them to the wreath, shape the greenery stems. Then, place them around the edge of the bow. I always build my bows from the focal point and creative movement up the wreath.
4. Add Cherry Blossoms
I chose cherry blossoms because they are the same shade of pink as the bunny’s hat. Keep framing the bow and add the cherry blossoms under and around it. Keep the wreath symmetrical. When you add flowers to one side, add them to the other side too.
5. Sprinkle In Accent Colors
Keep adding more florals at this point. A pop of yellow flowers brightens up the wreath and reminds me of the sunshine in spring.
You can also use bright blue colors that are the same shade as the blue in the ribbon. Look at your ribbon and bunny for colors that you can bring out in the flowers.
6. Wear Gloves
This was a very stiff moss wreath, so as I was adding my floral picks, I discovered that it was starting to hurt my hands. If your hands hurt when you work with a moss wreath, I suggest putting on gloves. It will add a little padding and won’t hurt as badly.
7. Add Carrot Picks
At this point, you can choose to be done – it really looks polished and perfect. I went a little extra and wanted to add a few carrot picks to the wreath. I kept thinking the Easter Bunny needed his carrots.
To make it look a little nicer, I removed the carrots from the full spray it was attached to and added them individually to the wreath.
How To Make An Easter Bunny Moss Wreath
Here is a video showing you how I made this cute Easter bunny wreath.
If you enjoyed this and want to learn to wreath the professional way, join me in our exclusive Wreath Making of the Month Club!
Happy Wreathing,
Julie
If you enjoyed this post, you might also like:
Liked this DIY Easter Bunny wreath? Pin it for later!