How To Make A Silk Flower Snowman Wreath
Follow this easy tutorial to make a festive snowman wreath with colorful silk flowers and a whimsical winter sign.
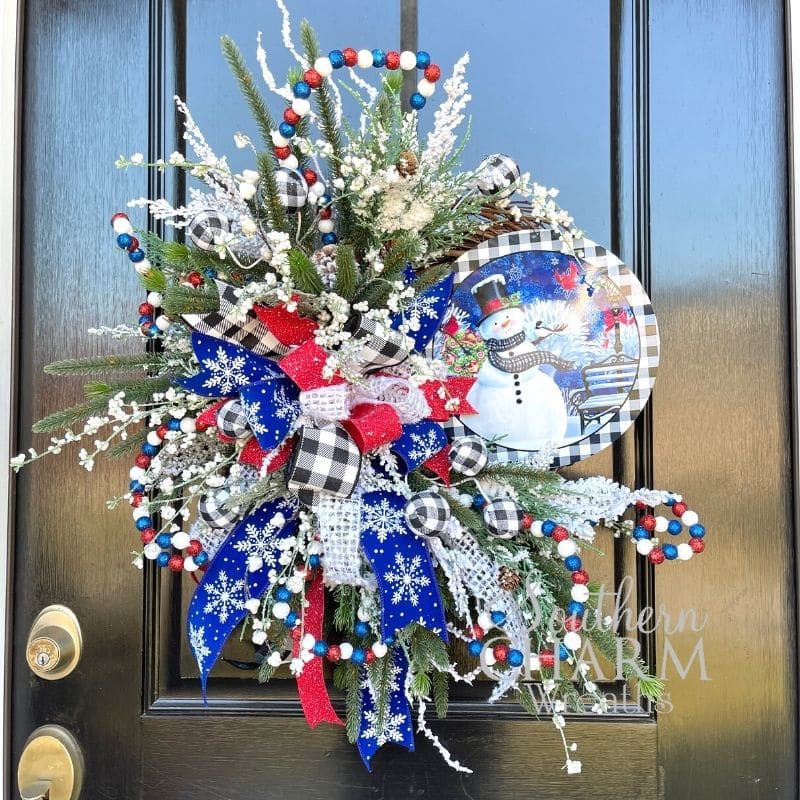
How To Make A Snowman Wreath With Silk Flowers
They say that blue is a cool color on the color wheel, and I can see why. When I look at this wreath, I feel the biting chill of fresh-fallen snow. Red accents liven it up with a welcome pop of color. It’s all set on a reliable grapevine wreath.
In this tutorial, I’ll show you how to use silk flowers and a happy little snowman sign to design a stunning snowman wreath! It’s a wreath that you can sell all winter long – not just during the holidays. The bold bows and complementary colors help it stand out from other wreaths out there.
I also have a video tutorial so you can see exactly how I made this wreath. It’s easier than you might think.
This post may contain affiliate links for your convenience. Click here to read my full disclosure policy.

Supplies For This Project:
- Grapevine Wreath
- Round Snowman Sign
- 22 Gauge Florist Wire
- 2.5″ Wired ribbons
- 1.5″ Wired ribbon
- 1″ Ribbon
- U-Shaped Wire Floral Pins
- Flocking
- Wire Cutters
- Greenery
- Winter Berry Picks
- Glue Pan
How To Make A Silk Flower Snowman Wreath: Step-By-Step Tutorial
1. Attach The Sign
The sign is the focal point, so you should attach it first. That way, you can build everything else around out. Punch a hole in the bottom and top of the sign and thread some florist wire through it. Then, thread the wire through the grapevine wreath and secure it by twisting it nice and tight.
2. Make The Bow
I love using bows as the other focal point. Bows are completely customizable. Make yours as showy or as simple as you want. I’ll share the measurements of my bow’s tails and loops, but you are welcome to make yours the length of your choosing.
When you are choosing the colors of your ribbons, pull from the colors and prints in the sign. For example, I used a snowflake ribbon that matches the blue background in the sign and a black and white buffalo plaid that matches the print on the outside of the sign. Since there are little red accents in the sign, I used a smaller 1.5″ red ribbon as my accent ribbon.
I started with the 2.5″ wired snowflake ribbon. Pinch and pleat the ribbon between two fingers on your non-dominate hand. Then, measure 12 inches and loop it away from you and pinch that with your same two fingers. This is the start of your bow’s first loop. Since you folded it in half, this is now a 6-inch loop.
Repeat this process two more times so that you have three loops. Trim it and keep this bow in your hand.
Then, I did the same thing with the 2.5″ wired black and white plaid ribbon. Make three more loops that are 6-inches each. Shape your bow as you go. Place the ribbon tails behind your loops so that the loops are on the top.
Then, use a 1.5″ (#9) wired ribbon (this is my red ribbon). Make another three loops that are 6-inches each, just like the first two. You can stop here or add a 4th ribbon. I used a pretty white ribbon as my final one.
Tie all the loops and layers of your bow together with a 22-gauge florist wire or pipe cleaners. Attach the bow directly across from the snowman sign using the florist wire.
3. Add Greenery To The Snowman Wreath
After you have the sign and the ribbon, use greenery to define the line of vision. To define what I call a “line of vision,” I mean you will direct how people’s eyes travel around the wreath.
I started by gluing evergreen branches on the top and bottom of the bow, placing them into the grapevine wreath. Continue layering the greenery pieces around the wreath, so it leads people to look from the bow to the sign.
4. Insert Flocked Branches
Add more texture and color by choosing more greenery branches that are flocked with snow. Layer them around the bottom and top of the bow and close to the sign.
To bring out the white, I added even more flocking, this time choosing bright white pieces.
5. Use Picks And Other Items
I love to use picks and items from other seasons in my wreaths, especially if the colors match what I am designing. I found a patriotic pick with wood beads, and the blue and red shades are a perfect match to my ribbons. They add the ideal texture contrast and help unify my bow and sign.
Keep adding more flocking, beads, or even ornaments and bobbles. Have fun and make your wreath look as festive as you want it.
Watch The Video: How To Make A Silk Flower Snowman Wreath
If you enjoyed this post, you might also like:
- DIY Gnome Christmas Wreath On Grapevine
- Rustic Reindeer Christmas Wreath
- O Holy Night Blue Christmas Wreath
Like this post? Pin it for later!

where did you get sign
Hey Donna, we only provide supply lists for our featured Wreath of the Month Club tutorials.
where did you get white ribbon- is it called window payne?
Hey Donna – Yes, it is window pane ribbon.
you didn’t give item numbers. What are the item numbers or names of the greenery, flocked, white spray and white flowers?
Hey Donna – We only give out SKU numbers for our Wreath of the Month Club tutorials.