DIY Snowman Table Centerpiece
Add a smiling face to your holiday craft show table! This snowman table centerpiece makes an endearing focal point, sure to draw the eyes of passersby. It’s made with plenty of whimsical elements, from snowball picks to spindly red berry branches. I’ll teach you how to make it in this step-by-step tutorial.

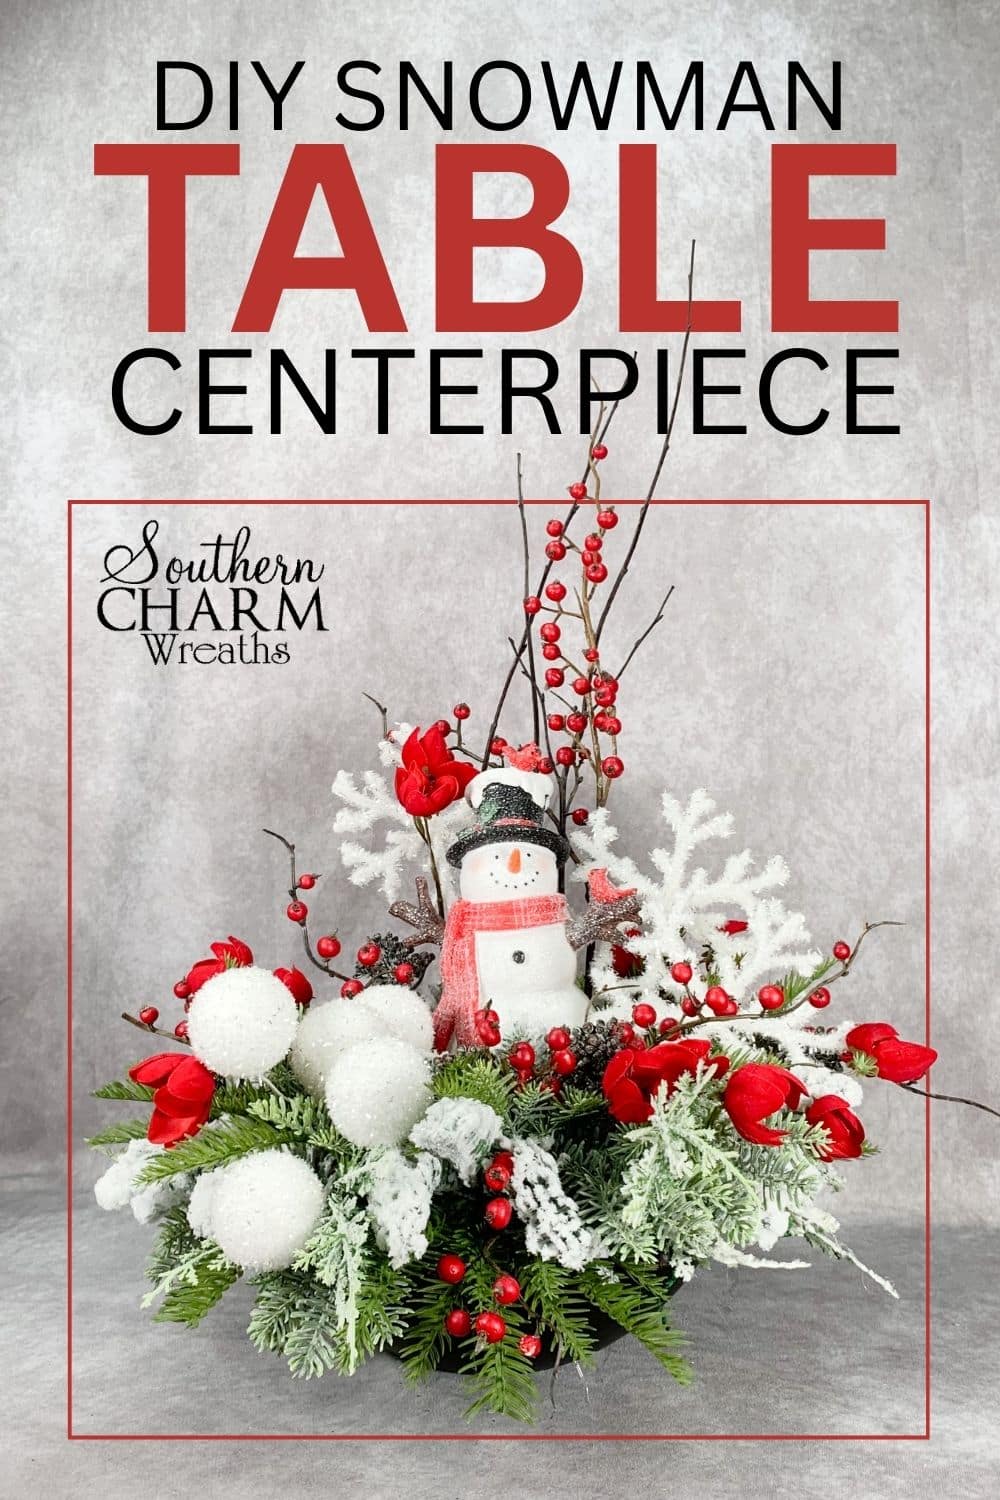
DIY snowman table centerpiece
Today’s winter arrangement will bring a whole lot of joy to those cold and snowy winter days. This snowman table centerpiece is a showy delight, made with textured flocked greenery, snowflake picks, and snowballs primed for throwing.
At the heart of this playful design stands a cheerful snowman figurine, ready to welcome holiday guests, craft show shoppers, and everyone who crosses his path.
This snowman centerpiece would make an excellent hostess gift, bringing extra fun to any housewarming or holiday party.
It also makes a great focal piece for a craft show table; picks, twigs, and berry branches give it an attention-stealing shape. And who could say no to that sweet snowman face?
Today, I’m sharing how to make your own showy holiday centerpiece, with step-by-step instructions that suit all skill levels. So without further ado, let’s get crafting, y’all!

And for more seasonal projects, sign up for my Holiday Arrangement Masterclass!
Supplies for this project
You’ll need:
- Snowman figurine
- Black dough bowl
- Assorted faux greenery
- Blue-green pine
- Darker green pine
- Flocked pine
- Snowy pine
- Snowflake picks
- Snowball picks
- Red faux flowers
- Faux berries
- Red
- Gray
- Black twigs
You’ll also need:
- Florist foam
- Spanish moss
- Wooden floral picks
- Wooden stakes
- Floral pins
- Duct tape
- Hot glue
- Florist wire
- Clippers
- Needle-nose pliers
Want more holiday design inspiration? Sign up for my Holiday Arrangement Masterclass or my Popular Holiday Wreaths tutorial bundle!
How to make a snowman table centerpiece
While this winter arrangement looks impressive, it’s actually quite easy to make (with a thorough tutorial, of course). Follow these steps to make your own!
1. Prep the mechanics
Your first step is to prep your base elements – AKA the mechanics.
First, tape a square of duct tape to the bottom of your bowl, hot gluing a small square of florist foam on top; this will elevate the base and save you from chiseling out a huge bowl-sized piece of foam!
Next, add a large round of florist foam on top to fill the bowl, securing it with hot glue.
Finally, add four wooden stakes through the foam layers to secure them, trimming any excess off the tops.
For the final touch, use floral pins to add a bit of Spanish moss to camouflage your foam.
2. Add your snowman centerpiece
Next up, the cute snowman centerpiece!
Make a space in the moss, slightly off-center from the middle of the arrangement. Dip the bottom of the snowman centerpiece in hot glue, then glue the base to your foam.
3. Make a base of greenery
Now, it’s time to layer our greenery; we’ll use four varieties for a professional appeal.
Begin by using clippings of blue-green pine, working with small pieces. Add your clipping throughout the design, aiming for an easy distribution. Use florist picks for smaller stems as needed.
Remember to manipulate each of your stems for a realistic, natural appearance.
Next, repeat this process for each type of greenery, one at a time. Move on to darker pine, then flocked pine, then a snowy pine. We’re aiming for layered, natural, and visually interesting.
4. Include snowy accents
Beyond the flocked greenery, we’re going to add a bit more snowy magic to this design.
Add a few snowflake picks to the arrangement, bundling them near the back and right-hand side of the design for a bit of height. Secure each pick to the florist foam with hot glue.
Then, balance this with five snowball picks focused on the left-hand side of the design. These accents really up the fun factor!
5. Add pops of red
For a bit of holiday red, add clippings of red flowers evenly throughout your established greenery, securing them with hot glue.
Repeat this step with red berries for more texture and color! This is a great chance to play with the shape of your design, letting the berry branches poke out from your greenery base.
6. Finishing touches
For the finishing touches, add small clippings of gray berries throughout the design for even more texture and contrast. Secure each clipping with hot glue.
This step will also help your arrangement look fuller against the spindly, whimsical elements.
Next, add long cuttings of black twigs near the back of your arrangement, securing them with hot glue; this will add height to the design and serve as a sort of backdrop for your snowman.
Finally, fill in any remaining holes with clippings of greenery, fluff your elements a final time, and your snowman table centerpiece is complete! Show it off at your next craft show and let me know how many adoring fans it brings to your table.
Watch the video: How to make a snowman table centerpiece
If you enjoyed this post, you might also like:
- DIY Lush Greenery Winter Wreath Idea
- Traditional Christmas Cardinal Wreath
- Burlap Winter Snowflake Wreath
Like this post? Pin it for later!

So much fun!
#REPLAY. I made several of these for gifts. This one of my favorite arrangements. Thanks Julie for always pushing us out of our comfort zone. I’ve learned a lot!