Burlap Winter Snowflake Wreath
This burlap winter snowflake wreath will take you well past Christmas time, looking perfectly seasonal all winter long; learn how to make this gorgeous glittering display!
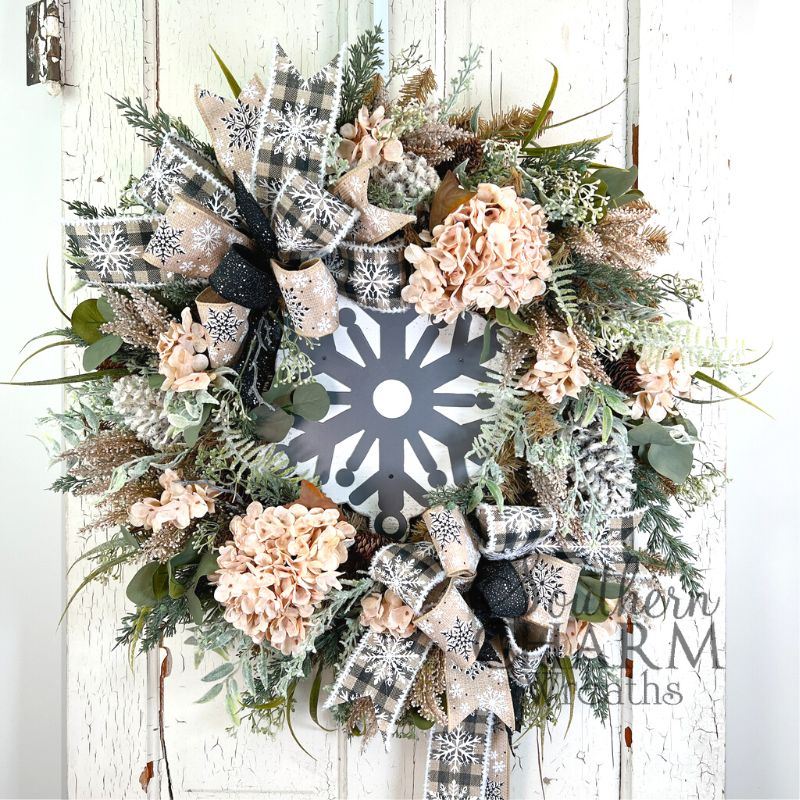
Burlap winter snowflake wreath
Today, I’m sharing a winter special – a stunning snowflake wreath with burlap, eucalyptus, and wheatgrass accents.
It’s made with beautiful dried hydrangeas, snowy pinecones, and plaid, glittery ribbons. The end effect has the perfect mixture of natural materials with a touch of glitz.
I love that this wreath will work all winter long, unlike the holiday types you’ll need to retire after Christmas.
Without further ado, let’s get to the wreath-making!
Supplies for this project
You’ll need:
- 1 – 1.5” Black Ribbon
- 1 – 2.5” Snowflake Ribbon
- 1 – 72.5” Snowflake Check Ribbon
- 1 – Mixed Seeded Eucalyptus Pine Mix
- 2 – Wheat Grass Bundle
- 3 – Beige Hydrangea Stem
- 1 – Pine Cone
- 1 – Mixed Greenery Bush
- 1 – Seeded Eucalyptus Bush
- 1 – Wood Snowflake Sign
- 1 – 24” Brown Evergreen Wreath Base
Thank you to our friends at Greenery Market for bundling these supplies together for easy purchase. For more information and to purchase, please visit Greenery Market or find the complete snowflake wreath kit here.
How to make a burlap winter snowflake wreath: Step-by-step tutorial
1. Prep your base
The first step to making a gorgeous holiday wreath is to fluff out your base. Begin by pulling up the pine pieces, being careful not to pull too far and create holes.
Next, we want to create a secure anchor for our wooden snowflake centerpiece. Use a staple gun to attach your wire anchors to four sides of the wooden snowflake. Then, add a dab of heated glue stick over each staple for extra support.
Set your snowflake aside until your glue has hardened, then attach it to the inner ring of your wreath using the anchors.
2. Make your bows
Now it’s time to make your bows!
Layer your 3 patterns of ribbons and decide which one you want to feature on top.
Begin by taking one ribbon, measuring a 12-inch section, then pinch and pleat, twist, and repeat twice. You should now have three loops.
Layer your ribbons by repeating the process with your next ribbon, starting your streamer above your thumb this time.
Repeat the process a final time for your center bow and use a florist wire to secure it. Then, repeat all steps for a second bow!
3. Add greenery
Prep your greenery by trimming, bending, and shaping each piece.
Sort similar greenery for an even assortment around your wreath. Set aside cut pinecones and white berries; we’re going to use them later!
Dip your cut greenery in hot glue and attach them to your wreath.
4. Place your bow and extra decor
Staple your bow to one top and one bottom corner of your wreath, spreading out your loops for a full and pretty effect.
Next, attach your dried hydrangeas using hot glue and the existing needle ties to secure them. Then, glue in your snowy pinecones, trimming as you need.
5. Add finishing touches
The final step to making our wreath look catalog-perfect is some extra filler and texture.
Add your cut pine cones and bits of texture that you set aside from your greenery. This will give a fluffy, full effect.
And just like that, your seasonal winter wreath is complete!
Watch the video: How to make a burlap winter snowflake wreath
If you enjoyed this post, you might also like:
- DIY Holly Jolly Deco Mesh Christmas Wreath
- How to Make a Simple Traditional Christmas Teardrop Swag
- DIY Traditional Christmas Santa Wreath
Like this post? Pin it for later!

I love watching you design the wreath! Your comments on the elements of design are helpful for color, shape, space, form, size, line, pattern and texture. Seeing you place the pieces where you do improves my understanding of wreath making!
It wasn’t long after I joined the month club, that I was diagnosed with colon cancer. However, it was a joy to watch when I could. Since I am 1 year cancer free, my body is just now getting back into the swing of making floral arrangements and wreaths. I even have a cancer ministry for women in my county that allows me to give the arrangements/wreaths as a gift to them…. Thank you for your creative ideas and knowledge!! You are reaching far more than you know!
Yours truly,
Soodie
#Replay 01-01-23
Love it!