DIY Patriotic Teardrop Swag
This Patriotic Teardrop Swag is the easiest way to show your love for this great country, creating a strong American pride vibe from your front door. Check out how to get this look, in less than an hour, and on a budget! That sounds like an American Dream come true to me.
How To Make Your Own DIY Patriotic Teardrop Swag
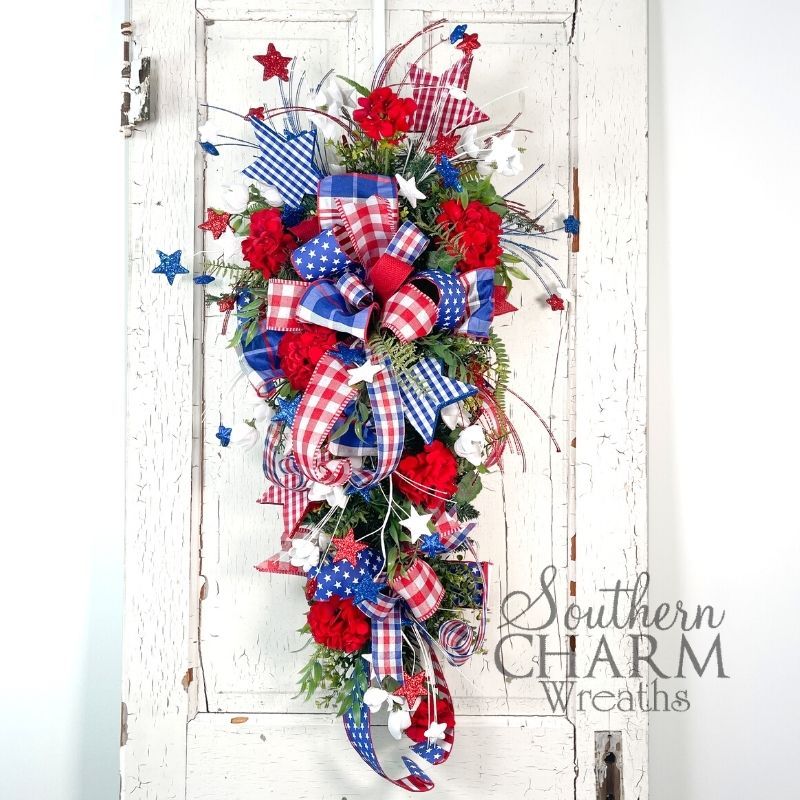
This DIY Patriotic Teardrop Swag beams with pride from the very first glance. The triple threat of red, white, and blue on this teardrop swag is exactly what you need to decorate your home for the 4th of July, or even Memorial or Veteran’s Day. And any excuse to celebrate this great country is a good one for me! The bursting glittery stars going here and there are my favorite parts though. They are just so great.
Dress up your front door, sell this in your Etsy shop, or both! Anything red, white, and blue is perfect to help decorate for those American holidays. This DIY craft is even okay to keep up all year round if you don’t have time to mix it up. Because you are always American, not matte the time of year!
This post may contain affiliate links for your convenience. Click here to read my full disclosure policy.
Supplies For This Project
- 32” Teardrop Swag
- Red and White Gingham Ribbon
- Blue and White Polka Dot Ribbon
- Red, White, and Blue Ribbons of all varieties
- Solid Red Ribbon
- Greenery
- Red Large Geranium Stems
- White Filler Flower
- Glittery Star Picks
- Large Gingham Star Picks
- Floral Wire
- Glue Pan
- Wire Cutters
- Scissors
- Staple Gun
DIY Patriotic Teardrop Swag: Step-By-Step Tutorial
1. Prep Your Swag
Prep your swag by positioning the pieces so they are nice and full. Fluff them here and there to make sure your swag is ready to have adorable bows, greenery, florals, and embellishments to be added to it.
2. Make Bows
Next, make the bow (or bows) for your wreath. Either follow along with how I do it in the video or make as many (or as few) loops as you want.
In other videos, I have shown you how to create all styles of bows. For this project, I have a large 5 ribbon bow to add up top on my teardrop swag and a 3 ribbon bow down below. I made bows with 3 and 5 different ribbons, and each ribbon has two loops. Here’s a quick overview of how to make a simple bow.
First, measure your tail. Then, make a loop and twist. Next, measure out 12 inches and make a loop, twist it, and make another loop. Finally, pull your tail down. Repeat this process with your two other ribbons. Be sure to hold each ribbon tight in the middle as you add your layers.
Twist some florist wire around the middle of your bow, twisting it as tightly as you can. Once it is secured, dovetail the ends of your ribbon tails.
3. Attach Your Bow
Use the wire you used to secure the bow together and thread that wire through the teardrop swag. Then, twist the wire together. Make sure you take the time to fluff and arrange your bow – this step is what really makes your bow look pretty! I added my 5 ribbon bow to the top mid section of my swag. Down towards the bottom, I added my 3 ribbon bow.
4. Add Greenery Picks
This is the best part of the process because it’s where your creativity takes over. Use greenery to add depth and fullness to the swag, always beginning at the top. I picked out different greenery bushes that contained other types of greenery to hide/mask your evergreen base. Be sure to fluff each piece before you add, bending and shaping as you go. Add them to your swag being sure you add hot glue to the ends to secure in place. Work them around your bows.
Remember to keep the design balanced. Whatever you do to the left, you should also do to the right. Continue to layer and add greenery, working your way away from the large bow up top and the smaller bow on the bottom. Your greenery pieces added below will be much shorter in length as well.
You can add as much or as little greenery as you want. Just eyeball what you think looks best and have fun. And don’t forget we will be adding more to it, so not too much greenery is needed.
5. Add Focal Flowers
Use florals to create a beautiful focal point for your swag. To do this, arrange individual pieces around the bow by dipping the ends in hot glue before placing them into the teardrop base. Work your way around the top and bottom of the bow, and make sure to keep both sides balanced. I use red geraniums with all different sizes of floral heads to tie in with my red ribbons.
6. Add Filler Flowers
Use simple white filler flowers to add some added beauty in the simplest of ways. Trim from the main bundle, playing with the stem to create the angle you want before you add to your main swag. Hot glue ends and work stems into place. Play with placement as you fill in throughout wherever needed. Be sure to angle your stems up as you insert to allow the flowers to drape down the arrangement. Also, make sure to keep both sides balanced on your swag. Adjust and fluff as you work. Sometimes a floral pin will help secure it if needed.
7. Add Star Embellishments
Patriotic Star Picks is such a fun look to add to this piece. Disassemble the star picks by removing sections from the main bundle. If you look at your swag and see some holes, these are the perfect spots to fill with your fun and festive embellishments. The big bold gingham stars are so much fun. They are an extra focal point that enhances the red, white, and blue ribbons used on your bows.
Eyeball any gaps you might have in your swag and work in any of your fun embellishments to really continue to create a fun, bright, and patriotic feel. Having them pop from your main section allows for an eye-appealing look overall. Their added length is a must too. Have fun and try not to overthink it.
8. Final Touches
With your leftover greenery, florals, and embellishments start filling the empty holes you see on your teardrop swag. You may find that all it needs is a nice floral or a piece of greenery to make it look complete and finished.
Watch The Video: DIY Patriotic Star Swag
If you enjoyed this post, you might also like:
DIY Patriotic Teardrop Swag? Pin it for later!

Absolutely beautiful!!!
Looks good very pretty
Very attractive like all of your designs. This design would go very nicly on my front door since it is white and the house bricks are red.
Love it