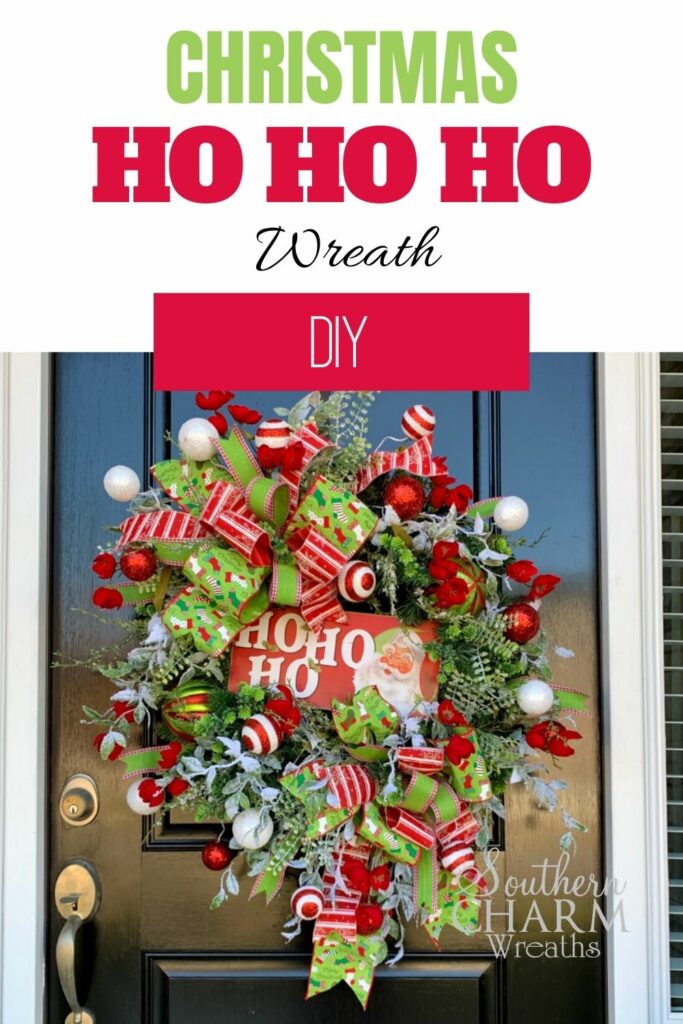
DIY Santa Wreath With Ho Ho Ho Sign
Create this easy DIY Santa wreath using an evergreen wreath as the base, then add a fun HO HO HO sign as the centerpiece. Here’s how!
Christmas wreaths are some of the most fun projects to create! Start with a cute Christmas sign and design around it. Craft along with me as I show you how easy it is to make your own DIY Santa wreath out of evergreen.

How To Make A DIY Santa Wreath
Supplies Needed
Here are the supplies you need:
- Evergreen Wreath
- Christmas Sign
- 22 Gauge Forest Wire
- 4-inch Wired Ribbon
- 2 1/2-inch Wired Ribbon
- 1 1/2-inch Wired Ribbon
- Flocking And Wreath Decorations
- Staple Gun
- Gorilla Glue Sticks
Instructions
Here’s how I made my DIY Santa Wreath with my cute Ho Ho Ho sign.
Step 1: Prepare the Sign
The very first thing you should do is remove any twine or string hangers on it and add some wires to the sign. The wires are what you will use to attach it to the wreath.
I used a staple gun to attach the wire to the sign.
Step 2: Make The Bows
If you are new to bow making and you need to purchase ribbon, always buy wired ribbon. It’s so much easier to work with and will make the best-looking bows for your wreaths.
For this bow, I used 3 different sizes of wired ribbons. I used 4-inch, 2 1/2-inch, and 1 1/2-inch ribbons.
If you are wondering where to buy ribbons, I got my ribbons from both DecoExchange and a local place called Carolina Pottery.
I measured the 4-inch ribbon, giving about 14 inches for the tail, and then another 14 inches for the first loop. This makes a 7-inch loop. Then, twist and measure another 14-inches, make a loop, and twist again.
Your bow will have 2 rabbit ears and two tails.
With the 2 1/2-inch ribbon I measured 12-inch loops and tails. Do the same twisting and looping that you did the first time. I made 3 loops this time instead of just two.
Finally, measure the 1 1/2-inch wired ribbon into loops that are 11 inches long.
When you are satisfied with how your bow looks, add a wire to keep everything in place.
Step 3: Add Additional Greenery To the Wreath
Even though this is an evergreen wreath, we still need to add more greenery to it. This will give it more texture.
Trim your greenery, stems, or sprays shorter so they don’t stick out too tall on your wreath. Then, just glue them to the wreath, spreading them out around it.
Step 4: Attach The Sign
After you add the greenery, attach the sign. I secured mine to the center of my wreath. You can also add your sign to the top or corner. Just be sure to put it where you want it and where it will stand out the most.
Step 5: Add Your Bows
Using wire, attach the bows to your wreath. Loosely add them with wire so that you can move them if you don’t like where you placed it the first time. You can also trim your streamers if you think they are too long.
Step 6: Add Flocking & Decorations
Use whatever you can find locally at your craft stores. I love adding a multitude of greenery and textures to my wreaths. This gives it dimension.
As you do this step, it helps to hang up your wreath on an easel so you can see what it will look like when it’s placed up.
Keep decorating until it’s as embellished as you want it to be! Do it simple or fill it with a bunch of different decorations – this is up to you.
DIY Santa Wreath Tips
As you make this wreath, here are a few tips that will make the entire process easier.
Keep Bows Simple
You only need a couple of colors of ribbons, sometimes a simpler ribbon is better. Don’t add too much variation to the styles and sizes of bows.
Shape Pieces Before You Put Them On The Wreath
Take the time to bend and shape your pieces before you add them to your wreath. This helps them to lay better.
Pre-Melt Glue Sticks
For glue, I melt Gorilla glue sticks in a hot skillet. Then, I just dip my decor pieces in the melted glue and stick them to the wreath. They stay put as the glue dries.
DIY Santa Wreath: Watch the Video
Ready to see how to make this DIY Santa wreath? If you are a visual learner, this video will show you exactly what to do, step by step.
See? It’s easy and will add so much festive fun to your front door!

try our Wreath Making 101 Workshop!
More Christmas Projects:
- How to Make a Christmas Lantern Topper
- How to Fluff an Artificial Wreath
- DIY Silk Flower Nutcracker Wreath
Liked this Christmas wreath tutorial? Pin it for later!
Thank you, I’ll be using this wreath design for my Elf Legs jumping through the wreath. Same color scheme.