DIY Summer Blueberry Wreath
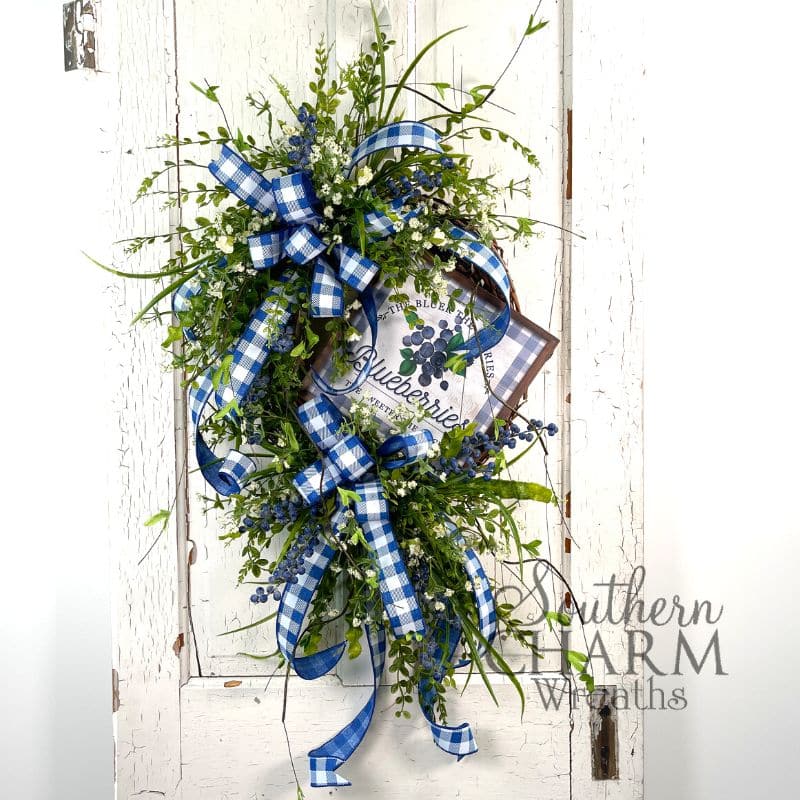
Discover how easy it is to make a summer blueberry wreath on grapevine when you use a wreath kit from Trendy Tree. It’s the best thing for beginners or crafters that are short on inspiration.

DIY Blueberry Wreath On Grapevine
What are your favorite types of summer berries? Strawberries will always be at the very top, but I’m also a huge fan of plump blueberries. They aren’t just delicious, but they are beautiful and fun to use in my decorating too.
The bright blue and white colors just look like summertime to me! That’s why when I saw the blueberry wreath kit from Trendy Tree, I knew I wanted to make it.
My favorite thing about this kit is the combination of colors. The checkered ribbon reminds me of summertime picnics and matches the sign perfectly.
If you are looking for a kit that gives you all the supplies you need for a summertime wreath, check out the kit from Trendy Tree. You won’t have to search for all the supplies from different places anymore and can spend more time crafting your wreaths.
The only thing that doesn’t come in the kit is the 16-inch grapevine wreath.
This post may contain affiliate links for your convenience. Click here to read my full disclosure policy.

Supplies For This Project
- 16-inch Grapevine Wreath
- 1 – AP7194 – 10″ Wood Square Blueberry
- 1 – RG0579925 – 1.5″ Check on Royal
- 2 – 13137GN – Plastic Boxwood
- 2 – 62479BL – Blueberry Leaf
- 1 – 13192GN – Plastic Grass Bush
- 1 – 62282BU12 – Gypso Bundle
- 1 – 61908NAT – Leaf Spray Branch
- Glue Pan
- Wire Cutters
- Scissors
- Staple Gun
Purchase the kit from Trendy Tree here while supplies last. Supplies are limited.
DIY Blueberry Wreath On Grapevine: Step-By-Step Tutorial
1. Prep And Attach Sign
The very first step is to attach the sign to the grapevine wreath base. I usually place signs at the top of the wreath, but this time I wanted to put it in the middle on the right-hand side. There isn’t any right or wrong place to put the sign – place it where you like to see it.
Attach wire to the back of the sign and then tightly twist the wire to the grapevine wreath base. Then, thread the wire through the wreath brambles and twist them tightly.
When you place the wires through the wreath instead of around the outside of it, you will leave more space for the greenery and ribbons to attach.
2. Make A Bow
Next, make the bow (or bows) for your wreath. In the video at the bottom of this post, I made two bows. The first one I made free-hand, and I used the EZ Bow Maker to make the second one.
You could even save time by making the bows ahead of time.
Watch my video below to see how I made the bows, or read this tutorial for specific step-by-step directions.
3. Attach Your Bow
Use the wire you used to secure the bow together and thread that wire through the grapevine at the top of your wreath, directly across from the sign. I want people to look directly at the middle of the wreath, so I placed the large bow just above and to the side of my sign.
Then, twist the wire together. Make sure you take the time to fluff and arrange your bow – this step is what really makes it look pretty!
Since I made two bows, I placed the second one on the bottom of the blueberries sign.
4. Add Greenery Picks
Next, pick out one of the greenery picks and insert it next to the top bow. Dip the greenery pick into some melted hot glue and insert it into the grapevine wreath, close to the top bow.
Continue adding greenery to each side of the top bow, working around both the top and bottom of the bow.
Keep layering and adding greenery, working your way away from the bow. After you are satisfied with how full the top bow is, add greenery around the bottom bow next.
5. Add Blueberry Picks
Now you are ready to add the blueberries! The kit from Trendy Tree included the prettiest blueberry picks. Break them apart and add them individually to your wreath.
To do this, arrange individual pieces around the bow by dipping the ends in hot glue before placing them into the grapevine base. Work your way around the top and bottom of the bow, making sure to keep both sides balanced.
You might have to add metal floral picks to the end of the blueberry stems if you break them apart.
6. Add Filler Flowers
Now it’s time to add a few filler flowers. These are flowers with smaller buds that have some pops of cream or white. Dip them into the glue and layer them throughout your existing floral and blueberry picks.
7. Final Touches
You can stop here, or you can keep going and add more layers to your wreath. Keep adjusting it until it is perfected to your liking.
Watch The Video: DIY Summer Blueberry Wreath
If you enjoyed this post, you might also like:
- DIY Summer Sunflower Door Hanger
- How To Make A Ladybug Summer Geranium Wreath
- Deco Mesh Bumblebee Wreath DIY Tutorial


Beautiful as always!
Julie,
Beautiful AGAIN!! You are amazing and your wreaths are exquisite!! Thank you for sharing!