Holly Jolly Deco Mesh Wreath
Hang this holly jolly wreath on your front door for a touch of whimsy in your holiday decor! Stripes, polka dots, and bright colors make this project super fun and fantastical.
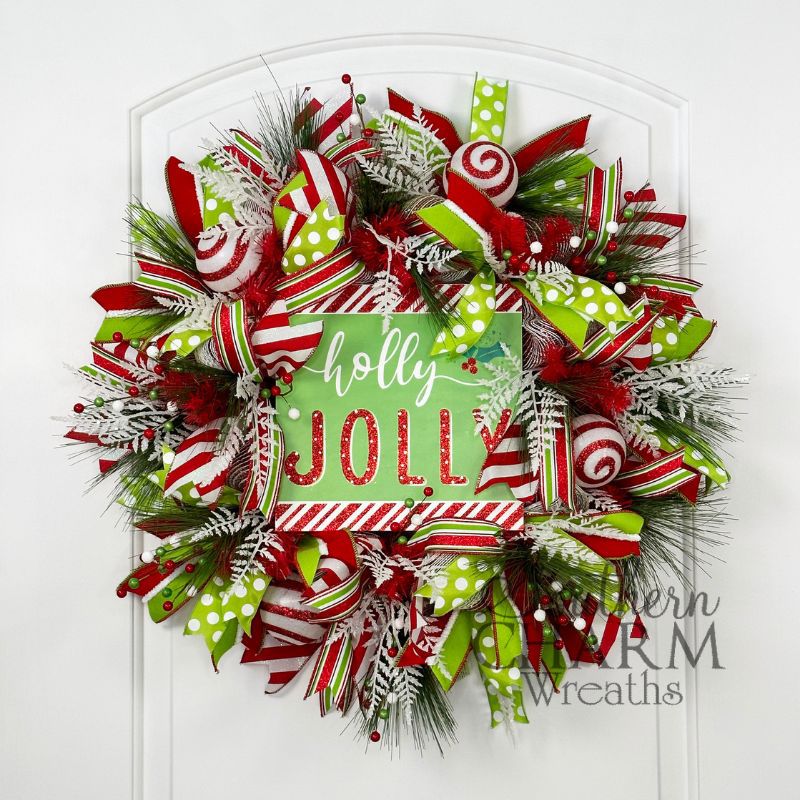
Holly Jolly Wreath
If you like whimsical wreath designs, you’re going to LOVE this holly jolly deco mesh wreath from Coach Laurie Anne.
Made with all the classic Christmas colors of red, white, and green, this deco mesh wreath is a holiday treat!
Learn how to perfect your deco mesh skills with fun patterned ribbons, pine accents, and a bit of white glitter foliage.
This post may contain affiliate links for your convenience. Click here to read my full disclosure policy.

Supplies for this project
You’ll need:
- Holly jolly sign
- 15” Work wreath form with red twist ties.
- 10” Christmas deco mesh
- Wired ribbon
- 2 ½” Red and green felt
- 1 ½” Lime green polka dots
- 2 ½” Red and white diagonal stripe
- 1 ½” Red, white, and green stripe
- Pine greenery
- White glitter foliage
- Christmas baubles
- Hot glue
- Staples
- Clippers
- Zip ties
- Florist wire
How to make a holly jolly wreath
1. Add deco mesh poufs
Your first step is to make your deco mesh poufs.
Start by folding three inches of mesh, then gather it together between your red twist ties. Twist to attach, then zip tie to secure. This will give you a clean, smooth edge from all angles!
Next, measure 10” for a deco mesh poof, twisting to secure it in the next set of twist ties.
Continue around the top layer, then again around the bottom layer.
Remember to separate your deco mesh once it’s added for a poofy effect!
2. Include ribbon tails
Next up, the ribbons!
Gather 13” cuts of all 4 types of ribbon.
Then, start by laying a polka dot ribbon over a red and green felt ribbon. Pinch at the center and twist into a set of red twist ties, pulling the ribbons apart to form an “X.”
Repeat this at the next twist tie, this time using a striped ribbon on top of your diagonal striped ribbon.
Alternate ribbons around your top and bottom wreath layers.
4. Add your holly jolly sign
To attach your holly jolly sign, simply add a little piece of cardboard to each corner on the backside.
Lay florist wire pieces over each corner, stapling them to the cardboard and securing them with a dab of hot glue.
To secure your sign to the wreath, simply stick your wires through the form and twist them to the red twist ties.
5. Use touches of greenery
For a bit of natural greenery, begin adding small clippings of pine throughout your wreath, securing them with hot glue.
Then, repeat with sparkly white fern for a wintery element!
Ensure all greenery is evenly distributed through the top and bottom layers of the wreath for balance and visual appeal.
6. Top off with Christmas baubles
Finish your design with a few red Christmas baubles evenly spaced throughout the top layer of your wreath. Remember to secure them with hot glue and aim for symmetry.
And with a few finishing tweaks, your holly jolly wreath is complete!
Watch the video: How to make a holly jolly wreath
If you enjoyed this post, you might also like:
- DIY Elegant Holiday Corner Swag
- How to Hand Tie a Holiday Bow Using 3 Ribbons
- DIY Whimsical Christmas Elf Table Centerpiece for Holiday Decorating
Like this post? Pin it for later!

I love this wreath and the tutorial is so helpful!!! I can’t seem to find the red, white and green stripe ribbon, the thicker stripes, not the thinner stripes. I love it so much and I was wondering if you remember where you purchased it from?
me again.. haha
also I couldn’t find 15 inch wire wreath so i got some 14 inch.
would the loops of deco mesh still be 10 inches each?
and how many twist ties and strips of ribbon for a 14 inch?
Hey Leah! This is something Julie helps with in our Wreath Making of the Month Club. If you are interested in learning more, please visit http://www.learntowreath.com for more information.