DIY Whimsical Christmas Elf Table Centerpiece for Holiday Decorating
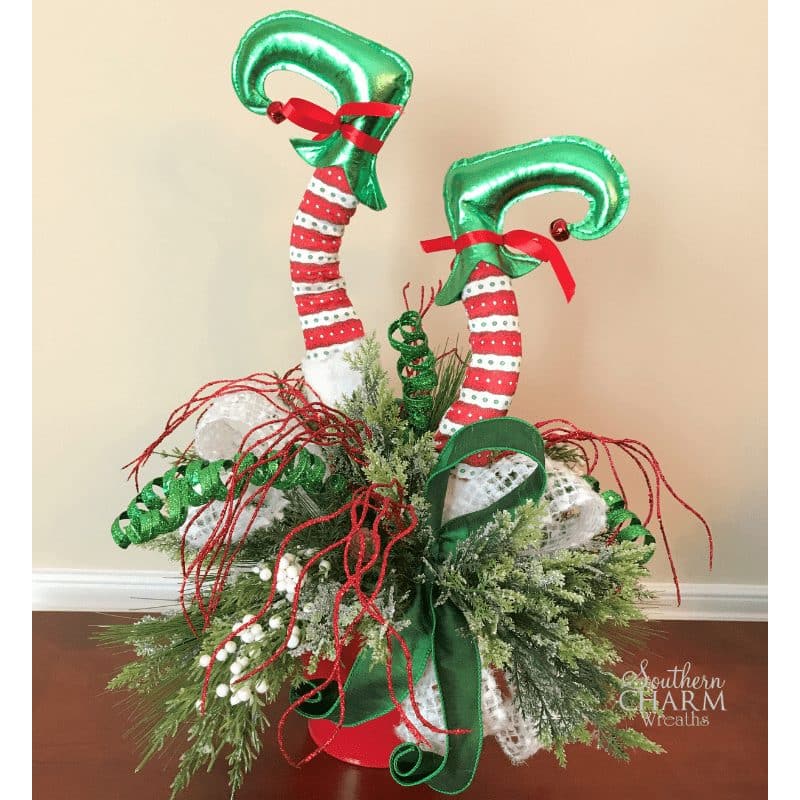
Today you’ll learn step-by-step how to create this whimsical Christmas Elf table centerpiece that your family is sure to love! With just a few supplies, you can put this together in one afternoon. Better yet, have your friends over for a fun crafting party and everyone goes home with their own centerpiece.
[Tweet “DIY Whimsical Elf Legs Christmas Table Centerpiece for Holiday Decorating”]
Supplies
(1 bag) Aquarium Rocks
(qty 1) Red bucket (Hobby Lobby)
Elf Legs (Trendy Tree)
(qty 3) Wooden dowels
(qty 1) Spanish moss
Assorted Greenery
(qty 1) White ribbon
(qty 1) Green ribbon
Assorted Christmas Picks (red & green)
Scissors
Floral Picks
Rotary Cutter
Silicone mat
Awl or Punch
Wire Cutters
Hot Glue Gun
Steps on How to Make a Whimsical Christmas Elf Table Centerpiece
Step 1 – Prepare the Bucket
Begin by adding aquarium gravel to the bottom of the bucket to weigh it down. Then add some hot glue over the gravel to keep it together. Next, add a bit of glue to the bottom of a piece of Styrofoam and place it on top of the gravel inside the bucket. Cut another piece of Styrofoam and glue it on top of the last piece so it now reaches the top of the bucket.
To ensure the Styrofoam pieces stay together, insert 3 wooden dowel pieces through the top and into the bottom piece.
Add bits of Spanish moss around the edges of the bucket to help cover the Styrofoam and give it a nice finished look.
Step 2 – Add the Elf Legs
Use an awl to make holes before inserting the Elf legs if needed. Then add a bit of glue to the pick on the Elf legs and insert them where you would like into the Styrofoam.
Tip: I like to bend the legs slightly to give it more interest.
Step 3 – Add Greenery
Add pieces of greenery into the Styrofoam by first adding a bit of glue to the pick. Don’t be afraid to cut the stems apart to make smaller pieces as needed and be sure to bend the stems of the greenery to make it more realistic.
Step 4 – Mix in Ribbon
Cut a strip of white ribbon, make a loop and attach to a floral pick. Then insert into the Styrofoam by the Elf legs. Repeat this step to make another ribbon loop to put by the other leg.
Step 5 – Add Christmas Picks & Fill In
Add your Christmas picks (I used red and green ones) into the base with a bit of hot glue.
Next, repeat step 4, but this time with the green ribbon.
Add additional bits of greenery as needed to fill in.
Step 6 – Cleanup
Trim any ribbon pieces that are too long and clean up hot glue strings that may have gotten caught on pieces of your creation.
There you have it, a whimsical Elf Christmas table centerpiece for Holiday Decorating.
Video DIY Whimsical Christmas Elf Table Centerpiece
Let me know how you enjoyed this tutorial by commenting below. If you found this tutorial useful, please share it now.
Happy Wreathing,
Julie
If you enjoyed this post, you might also like:
How to Make an Elegant Deco Mesh Christmas Wreath
DIY Christmas Tree Topiary for Your Table
How to Make a Deco Mesh Snowman Wreath
What a delightful centerpiece! I am planning to make one Christmas and use it on my grandchildren’s table. Thanks for sharing.
Hi, I made a larger version of this and I love it, however, the styrofoam blocks do not adhere well to the aquarium rocks at the bottom of the container. I tried various glues with no success. Any recommendations?
I use gorilla glue sticks and you also add liquid gorilla glue.
Christmas is my favorite! I am going to try ( I’m not crafty ) and make this. I’ll post a picture. Thank you for sharing. I enjoy seeing all your crafts