DIY Fall Peony Wreath
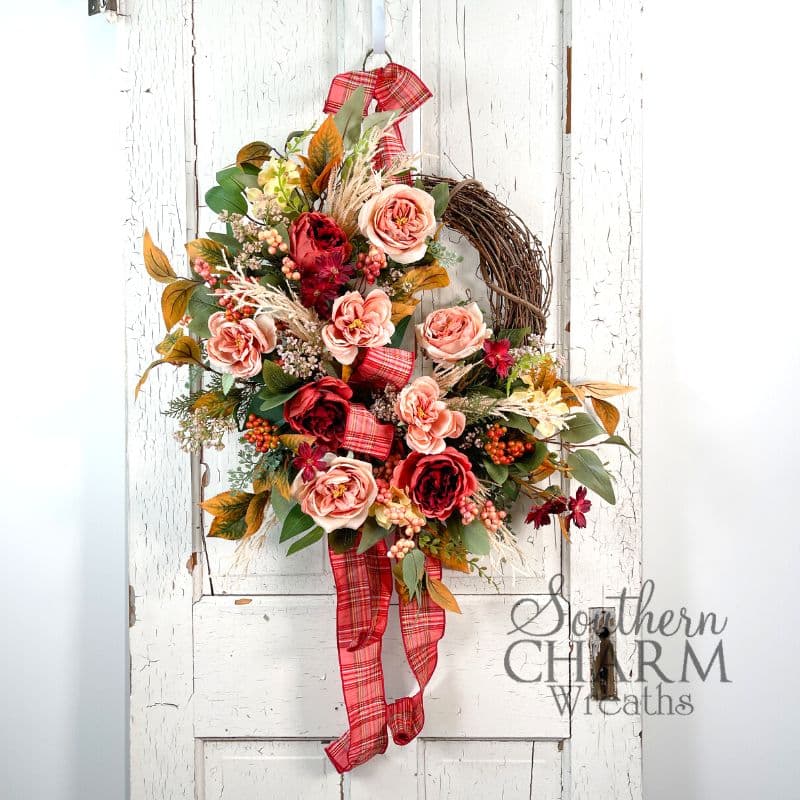
Easily make a gorgeous fall peony wreath with faded autumn colors on a grapevine wreath. The florals perfectly capture the seasonal colors.
How To Make A DIY Fall Peony Wreath
As much as I love pumpkins, this fall wreath doesn’t use a single one (or even the color orange!). This wreath is for anyone looking for a way to decorate for fall that doesn’t use pumpkins.
Every fall, the leaves fade and fall to the ground. Flowers stop blooming and dry out. It’s a time of dormancy, getting ready for the cold winter ahead. That feeling of watching an autumn sunset is exactly what I tried to capture in this floral wreath.
The peonies are the most striking colors of deep red and light pink. They contrast beautifully and enhance each other.
Beginners and pros, join me as I show you how to make your own floral fall peony wreath on a grapevine.
This post may contain affiliate links for your convenience. Click here to read my full disclosure policy.

Supplies For This Project:
- Grapevine Wreath
- Red and Pink Peony Bunch Picks
- Ficus and Other Greenery Stems
- 22 Gauge Florist Wire
- 2 1/2-inch Wired Ribbon
- 1 1/2-inch Wired Ribbon
- 1-inch Ribbon
- U-Shaped Wire Floral Pins
- Raffi
- Fall Garland
- Neutral Greenery
- Wire Cutters
- Glue Pan
How To Make A DIY Fall Peony Wreath: Step-By-Step Tutorial
1. Establish The Foundation
The first thing we will do is use greenery to establish the form of our wreath. Take a long ficus stem, dip the end in hot glue and insert it into the bottom right corner of the wreath so that the stem curves upward.
Then, add two more ficus stems curving down and around to the other side of the wreath. This base of greenery will create the movement in your wreath, directing everyone’s eyes around the focal points.
2. Insert The Bow
Hand-tie a simple bow and attach it to your wreath. I made my bow out of a coordinating red-plain color and just made two simple 6-inch loops. I gave it a long tail so that it would hang down loosely from the wreath.
This ribbon adds a soft texture to the wreath – I love how it reminds me of a picnic blanket.
Place your bow in the bottom-left corner of your grapevine wreath in between the ficus pics that are going in opposite directions.
3. Add Peonies
Save yourself time and buy fall floral bundles. I found a bouquet of peonies, leaves, and foliage. All the colors coordinate perfectly, and I don’t have to spend time looking for leaves or greenery that matches.
Then, separate the bundles and sort the flowers and foliage by type. I like to sort them this way so I can grab the colors and sizes I want very quickly.
Start with your favorite color peony, and insert it above the top of the bow. I started with the peony that reminds me of paprika.
Tip: If your flower’s stem wiggles too much, it might need a bit more girth. In that case, add a floral pick to the bottom of your flower’s stem. Now it will sit down inside the wreath easily.
Keep adding as many florals as you wish. I added the blush pink peonies next, layering up and around the wreath, keeping it balanced on both sides of the bow.
3. Layer With More Greenery Picks
Now you are ready to add the rest of the greenery picks that came in your bundle.
As you add the greenery and berries, remember to define the line of vision. In other words, establish the way people’s eyes will move across the wreath. I always start on the top closest to the bow and then repeat at the bottom of the bow. Then, I add pieces in layers, building away from the bow, around the wreath.
I also try to keep the wreath balanced. If I add something to the top, I try to balance the design below the bow too. That is why I call the bow the binding point – it is what holds the entire design together.
4. Fill In The Gaps
Keep adding more pieces with a variety of different textures and colors until you feel like the wreath is complete.
As you add more flowers and foliage, fluff them out. Don’t be afraid to remove some pieces and move them around. This is why I prefer to work on an easel. I like being able to look at it, just like it would look when it hangs on a door.
Watch The Video: How To Make A Fall Peony Wreath
If you enjoyed this post, you might also like:
Like this post? Pin it for later!

I love this and I was wondering where you got the bundles that you took apart????
Hey Terri – You can find all of Julie’s favorite vendors in our Big Book of Faux Floral Suppliers here:
https://southerncharmwreaths.com/faux-floral-suppliers/
I hope this is as easy as you make it seem. I really want to get started making wreaths.
Thank you for showing us how.
Beautiful ??