How To Make A Flip Flop Wreath
Follow this easy video tutorial and learn how to make a flip flop wreath. This is perfect for the summertime on your front door.
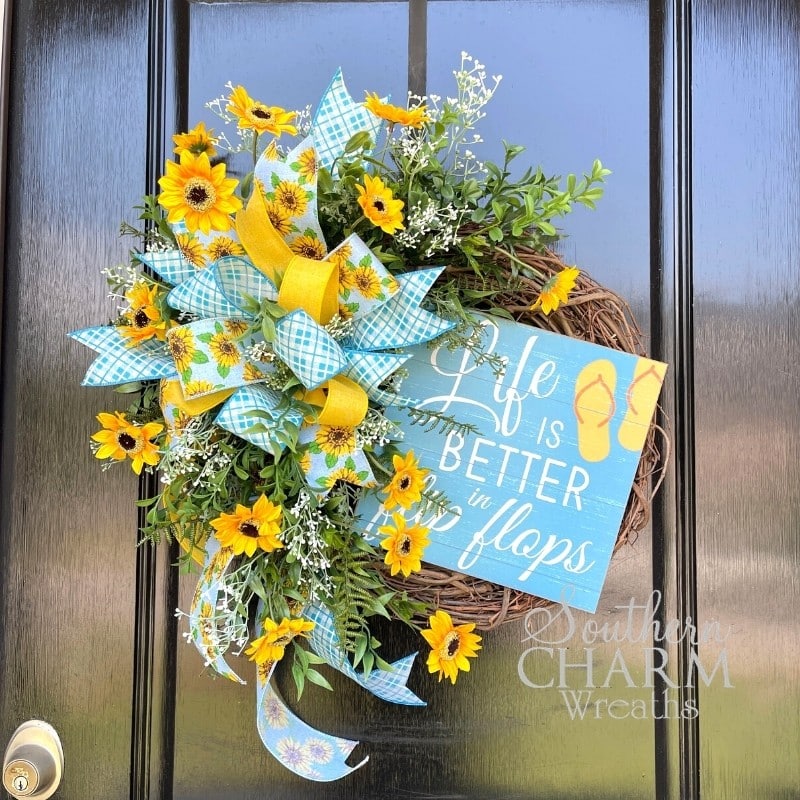
How To Make A Summer Flip Flop Wreath
Summer is all about sunshine, blue skies, and picnics! I designed this wreath around the whimsical sign that says, “Life Is Better In Flip Flops” – and as a southern girl I could not agree more! This fun flip flop wreath captures the warmth and carefree feelings of summer. It’s really easy and you’ll have fun as you make it.
Supplies for this project:
- Flip Flop Sign
- 22 gauge Florist Wire
- 16 inch grapevine wreath
- 2 1/2-inch wired ribbons from Carolina Pottery
- 1 1/2-inch yellow wired ribbon
- Wire Cutters
- Greenery
- Mini Sunflowers
- Glue Pan
- Staple Gun

How to Make a Flip Flop Wreath: Step-By-Step Tutorial
1. Prep and Attach Your Sign
The very first step is to attach the sign to your wreath. Do this first so that you can build around the wreath. It should be focus of attention.
Remove the wire hangers that came with the sign, if it has any. Then, place the flip flop sign face down and staple the floral wire onto the back. You will use these wires to attach your sign to the grapevine wreath. Place the sign on the side of the wreath that you want it to stay on and then twist the wires around the wreath.
I always thread the floral wire from the sign through the grapevine wreath. This way it leaves room for the florals that I add later on.
2. Make A Multi-Ribbon Bow
To make multi-ribbon bows I always use 22-gauge florist wire. If you think that is too slippery for you, you can use florist tape or even pipe cleaners. Florist wire feeds better through a grapevine wreath.
I used 3 different ribbons in my bow. The first one is a 2 1/2-inch wired ribbon from Carolina Pottery. It has the same shade of blue as in my sign. The next one is also 2 1/2-inch (or #40) wired ribbon with sunflowers on it. Finally, I used #9 (1 1/2-inch) yellow wired ribbon.
Start by cutting an 18-inch piece of the sunflower ribbon and setting aside. Then, measure 8 inches of the blue checkered ribbon.
Please understand that you don’t have to measure your bows. I’m sharing measurements so that anyone that is a beginning bow maker can learn the basics and not be so intimidated by the process.
Pinch and pleat the ribbon between two fingers on your non-dominate hand. Then, measure 12 inches and loop it away from you and pinch that with your same two fingers. This is the start of your bow’s first loop. Since you folded it in half this is now a 6-inch loop.
Repeat this process one more time so that you have two loops. Trim it and keep this bow in your hand.
Do the same thing with the same measurements with the sunflower ribbon. Make another 2 loops that are 6 inches each, just like the first one.
Shape your bow as you go. Place the ribbon tails behind your loops so that the loops are on the top.
Finally, pull in the 1 1/2-inch yellow ribbon. Make another two loops are that 6-inches again. When this last ribbon has all the loops, you can choose to end it here and secure it with the florist wire. Or, you can add one more layer to it.
3. Add The Center Loop To The Bow
I wanted to add one more layer to my multi-ribbon bow, so I took the first blue ribbon and measured 10 inches to make a 5-inch loop. This gives my bow more dimension. I only made one loop with this ribbon.
Then, grab that 18-inch wired ribbon piece and add it to the back of your bow. The bow is now complete! Wrap and twist the florist’s wire around the bow. Make it nice and tight and secure.
4. Attach The Bow To The Wreath
You will have enough florist’s wire to go through the grapevine and attach the bow to the wreath. Twist the florist’s wire and make it secure.
Where you place the bow isn’t important – place it where you want it.
Then, dovetail your ribbons. This is optional, but I think it gives the bows a nice finishing touch.
5. Add Florals and Greenery
Now you are ready to add the flowers and greenery. I didn’t add very much greenery – I used more florals. For this wreath I used greenery from Trendy Tree. It has different pieces of greenery in each bush – some ferns, some evergreen and some berries. It adds texture when you mix up the greenery.
Fluff out the greenery and trim it so it doesn’t stick out too far when you place it into the grapevine wreath. Then, dip the end of the greenery picks into some hot glue and stick it in around your bow. Begin building from near the bow and go out and away from it.
Keep adding more greenery until you are satisfied with how full it is. If your greenery is too thin, attach some floral picks to it.
6. Add Florals To The Wreath
If you used the same sunflower ribbon that I did, add some mini sunflowers to the wreath too. Trim the sunflowers and separate them so you can add them in individually.
Layer them on top of the greenery and attach them to your wreath. The best way to attach them to your wreath is to dip the end of the floral pick into some melted hot glue and stick the sunflower into the grapevine wreath.
I like to add them in one by one so I can control where each blossom appears on the wreath, but you can add them in groups of 2 or 3 if you want.
Then, you can finish here or add some baby’s breath or berry bush as a final layer to your wreath.
That’s it! This is as full and extra or simple and minimal as you make it.
Watch The Video: How To Make a Flip Flop Wreath
If you enjoyed this post, you might also like:
Liked Learning How To Make A Flip Flop Wreath? Pin it for later!

What do you do when your sign ends up being a little too heavy for the wreath? I have a sign similar to this but it was thicker than I realized. I attached it to the side of the wreath (a deco mesh one) and now the wreath doesn’t hang straight because it’s heavier on that one side. I’d love any tips! Thank you!
You can add a wreath hanger and move the hanger closer to the sign