Elegant 4th of July Wreath Tutorial
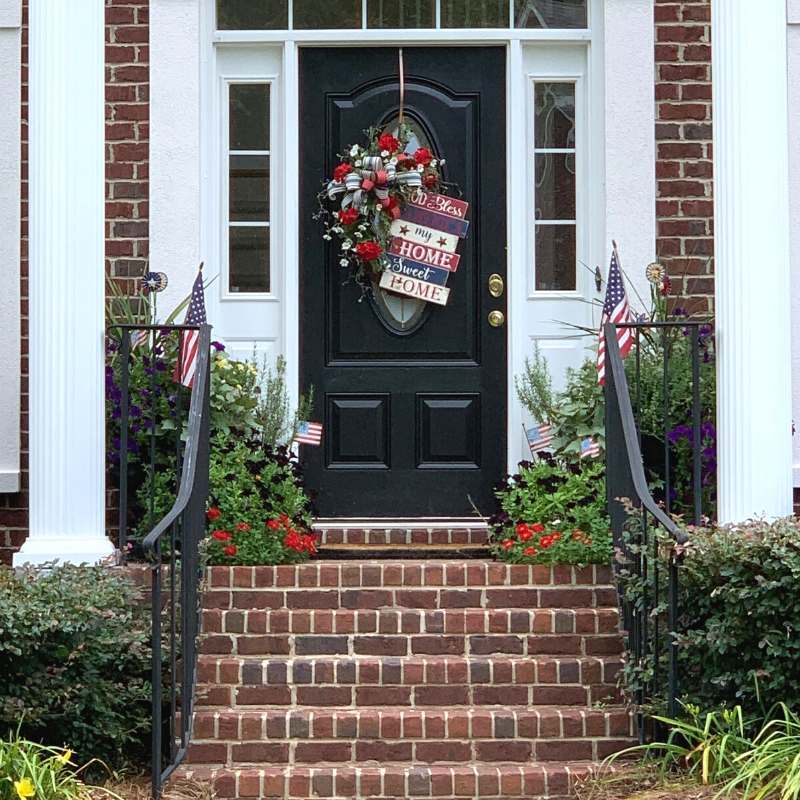
To all you wreath sellers out there, let me ask you a question: Do you have a good selection of oval wreaths in your shop? If not, let me be the one to give you the push to start doing that. Yes, a round wreath is certainly more traditional, but those of us with the big oval windows on our front doors LOVE oval wreaths! It makes our doorscape look more put together and intentional. If you add a selection of oval wreaths to your arsenal, you will likely be better serving your customers, and isn’t that what this is all about? In this elegant 4th of July wreath tutorial, we’ll add silk flowers, a sign, and a bow to make a stunning oval wreath on a grapevine.
This post may contain affiliate links for your convenience. Click here to read my full disclosure policy.

Supplies for This Wreath
I found the sign, ribbon and most of my supplies for this project at Carolina Pottery. Don’t forget to tell them Julie sent you! Here’s what you’ll need:
Hacksaw
God Bless America sign (Carolina Pottery)
Oval grapevine wreath – 16 inch wide (Carolina Pottery)
Wired ribbon (Carolina Pottery)
Silk flowers and greenery (Carolina Pottery)
Florist wire
Scissors
Wire Cutters
Hot Glue Pan
Glue sticks
Craft mat
Fourth of July Wreath Instructions
[Tweet “How to Make an Elegant 4th of July Wreath”]
Step 1 – First, you’ll need to remove the stake from the bottom of the sign. If you can pry it off with a flat head screwdriver, that is the best option. But sometimes signs like this have the stake glued on the back and it can start to crack if pry too hard. I ended up having to use a hacksaw to remove the stake from this sign.
BE VERY CAREFUL IF YOU DO THIS!
You just have to get it started in one corner and once it’s wedged in the wood, you can just pull back and forth and let the saw do all the work.
Step 2 – Next, determine placement for your sign. Then staple wire to the back of your sign and add a bit of hot glue over the staples to add extra stability.
Step 3 – While the glue on the sign dries, make your bow. For this particular bow, I used three different ribbons. The largest one goes in the back, forming four 12″ loops, and the second and third layers are made with three 12″ loops each. Fasten bow together with wire or a pipe cleaner.
Click here for detailed bow-making instructions.
Step 4 – Next, attach the sign to your wreath using the attached wire and then add the bow. Fluff and arrange the bow so it is to your liking.
Step 5 – Now it’s time for the flowers and greenery. I started by adding the greenery around the bow and then out from there. Remember to add hot glue to the stems first so they will attach to the grapevine. I added the geraniums next followed by the smaller filler flowers. Be sure not to cover up the sign too much. To finish your florals and give the whole piece a more finished look, go back in and add in greenery underneath anywhere that looks a little sparse.
Watch the video below for detailed instructions.
How to Make a 4th of July Oval Wreath
Do you decorate for the 4th of July? It’s a great time to switch up your front door décor and show your patriotism at the same time. Remember, you don’t have to have the exact sign and ribbon I have. Check out www.carolinapottery.com for tons of options.
If you enjoyed this and want to learn to wreath the professional way, join me in our exclusive Wreath Making of the Month Club!

Happy Wreathing,
Julie
If you enjoyed this post, you might also like:
DIY Summer Sunflower Door Hanger
Easy 4th of July Wreath Tutorial
Liked this Elegant 4th of July Wreath tutorial? Pin it for later!

Julie , I love this patriotic wreath. I also loved the one you made at Carolina Pottery. Girl I love everything you make and teach. Thank you so much for everything you do !
Karla Barefoot