Merry Christmas Ornament Door Hanger with Coach Laurie Anne
This Merry Christmas ornament door hanger is cute and festive, made with holiday ornaments, snowflake picks, and gorgeous snowy greenery.
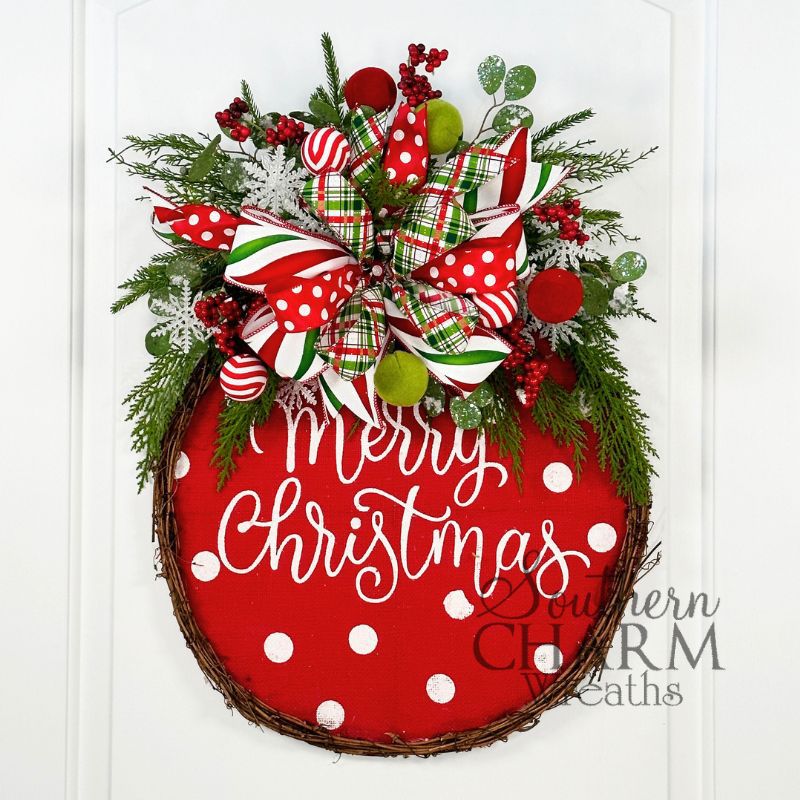
Merry Christmas ornament door hanger
Today’s design spreads holiday joy like no other!
I love this Merry Christmas ornament door hanger for its festive details, glittery touches, and lush faux greenery.
Best of all, it’s surprisingly simple to make!
This post may contain affiliate links for your convenience. Click here to read my full disclosure policy.

Supplies for this project
You’ll need:
- Festive canvas door hanger
- Faux greenery
- Cedar
- Norfolk pine
- Iced & snow-covered eucalyptus with berries
- Holiday ball picks
- Glittered snowflake picks
- Silk, wired ribbon
- 2 ½” holiday stripe
- 1 ½” holiday plaid
- 1 ½” red polka dot
- Styrofoam
- Hot glue
- Clippers
- Florist pins or twist ties
- Floral picks or steel picks
- Florist wire
How to make a Merry Christmas ornament door hanger
1. Build your mechanics
To start, you’re going to want to secure your base.
Take your canvas door hanger and attach a 2 ½” length of styrofoam to the top center, using hot glue and floral pins to secure it.
Stick floral pins in both the back and front of the design for extra hold.
2. Incorporate greenery
Next up – the winter greenery!
Begin adding cedar on either side of the door hanger, using the foam as a focal point and working outwards.
Secure each piece with hot glue, building out to create form.
Add little stems of cedar near the top of the styrofoam, then clippings of Norfolk pine throughout for more dimension and texture.
3. Add your bow
To create your bow, first measure 8” of holiday stripe ribbon, pinch, and pleat. Then measure 12” for a 6” loop, pinch, and twist. Repeat for a total of four loops, then trim the tail.
Next, work on top of this base with the red polka dot ribbon. Repeat the steps above, this time only creating two loops.
For the plaid ribbon, measure an 8” tail, pinch, and pleat, then 11” for a 5.5” loop, repeating for a total of four loops.
Secure with florist wire, wrapping around the center and pulling tight.
Then, measure 12” of red polka dot ribbon, fold it in half widthwise, and tie it in a knot around the center of the bow.
Attach your completed bow to the door hanger, using a florist pick and hot glue to stick it into the center of the styrofoam.
4. Add textured greenery
For more texture and beauty, add small clippings of eucalyptus with berries throughout the design, filling in with sprigs around the established form.
5. Include festive picks
Keep things festive with red, white, and green ornament picks, gluing them evenly throughout.
Then, do the same with glittery snowflake picks!
Finish your design with a ribbon tail near the top of your sign for more color, height, and texture.
Make any last tweaks, and this door hanger is ready to be enjoyed!
Watch the video: How to make a Merry Christmas ornament door hanger
If you enjoyed this post, you might also like:
Like this post? Pin it for later!
