How To Make A Patriotic Table Arrangement For 4th Of July
Follow this tutorial to make a beautiful patriotic table arrangement for the 4th of July. The red tulips just pop in this stunning display!
How To Make A Patriotic Table Arrangement For The 4th Of July
Making patriotic centerpieces has never been easier. I love finding red, white, and blue flowers that all look so festive together. This is a really fun arrangement to make, especially when you find the perfect container for it.
This patriotic table arrangement has lots of volume, shape, and texture. To me, the flowers look like they are mimicking fireworks! Keep reading and I’ll show you how to get this exact look in your flowers.
Supplies For This Project
- Small Wood Box
- Foam Blocks
- Silk Flowers
- Greenery
- Wire Cutters
- Glue Sticks
- Faux Moss
- Ribbon

How To Make A Patriotic Table Centerpiece – Step By Step Tutorial
This arrangement was designed by a florist friend of mine – Jackie Johns in Alabama – and I am thrilled to show you how to make one just like it.
1. Prepare The Container
First, look at your container – does it have an obvious front and back? Some containers will have graphics or images on the front. If yours does, keep this is mind as you design the centerpiece.
Then, begin to insert the florist foam blocks. I dipped my foam into melted glue sticks and glued it to the bottom of the container. You can use either Styrofoam or desert foam. Use a wooden floral pick to keep the blocks together.
Keep adding foam until it reaches the top of your container. Fill your container completely with the foam too. You might have to cut some blocks into thinner shapes so that they fit on the sides of the container.
2. Layer With Moss
Take some faux moss and begin filling the top of the container completely. Keep adding moss to the corners and every side of the container so that you can’t see the foam blocks anymore.
Use wire to secure the moss to the foam blocks.
3. Begin Adding Flowers
Start with your tallest flower and place it directly in the center of the container. When you trim the stem, always cut at an angle. This way, it will have a sharp edge that will stick into the foam easier.
Bend the flower’s stems. This gives it a realistic look.
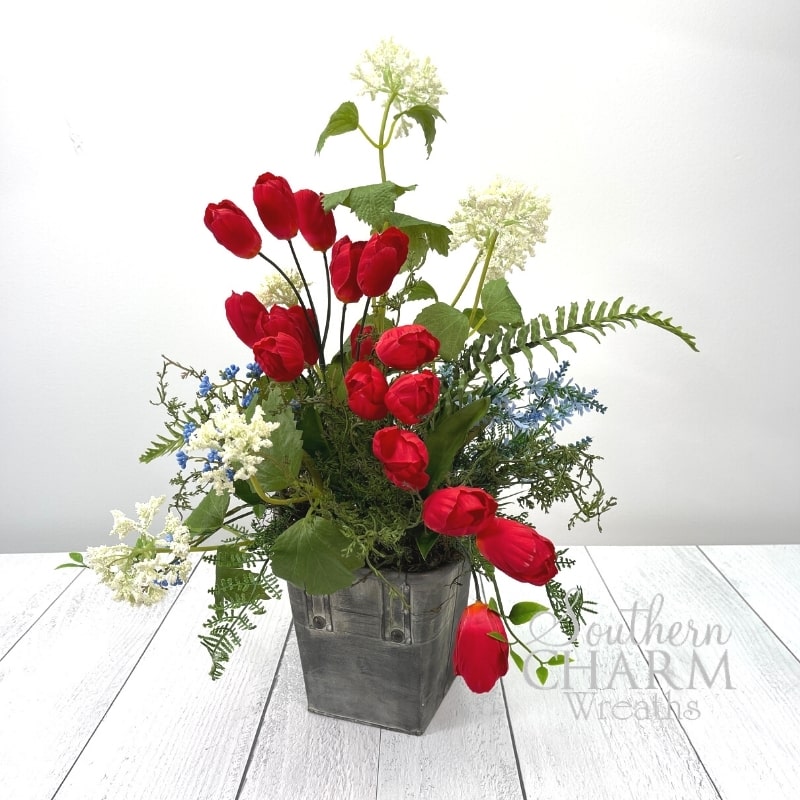
The white flowers in my arrangement are Queen Anne’s Lace. They have a delicate texture and small bloosoms that don’t compete with the bright red tulips.
4. Trim And Add Tulips
Keeping the middle Queen Anne’s Lace as the tallest flower in the middle, begin to add the red tulips. Look at the front of your container and create a visual line with your tulips.
To create a visual line, trim the tulips so that they are shorter as they go across the front of the container.
Bend the tulip stems so that they look more realistic. Tulips are constantly drooping in real floral arrangements.
5. Insert Blue Flowers
For the blue, I used Sweet Veronicas. They have small blossoms that fade into the background of the arrangement.
These come in a large bundle, so use some wire cutters to disassemble the bouquet. When you have individual floral stems, you have more control over where you place each one and how many you use.
Keep some of the blue flowers a little higher so that it helps your eyes flow through the arrangements naturally. Group all of the blue flowers in one area.
6. Fill In With Greenery
I used Sweet Anne Fern as the greenery that fills in the empty spots. This will give your arrangement texture and makes it look thicker.
I always start with florals first and use greenery to fill in the empty spots in between. This helps me to save space for the important flowers. I also use less greenery this way too.
Use as many different types of greenery as you want. There are so many fun varieties out there – and they all add their own beauty to the arrangement.
That’s it! You can also add a bow and ribbon if your container needs it. In the video below, I did not add a ribbon because my container was already looking pretty good.
Watch The Video: How To Make a Patriotic Table Arrangement
If you enjoyed this post, you might also like:
- Patriotic Monogram Floral Door Hanger
- Elegant 4th Of July Wreath Tutorial
- Rustic Patriotic Rooster Wreath
Liked this Summer Flower Arrangement Tutorial? Pin it for later!

Thanks. It was very informative. I learn several things. The arrangement is lovely.
Thank you for taking the time you have spent
giving the Instructions!!!! I know you are very busy, I am sure a lot of Crafters appreciate it.
It is the most beautiful rose arrangement!!!!!
I am still dumb where did you get the box and
flowers? Thank You, Thank You!!!!
Absolutely beautiful! You make it look so easy.
I hope to one day be able to do this.