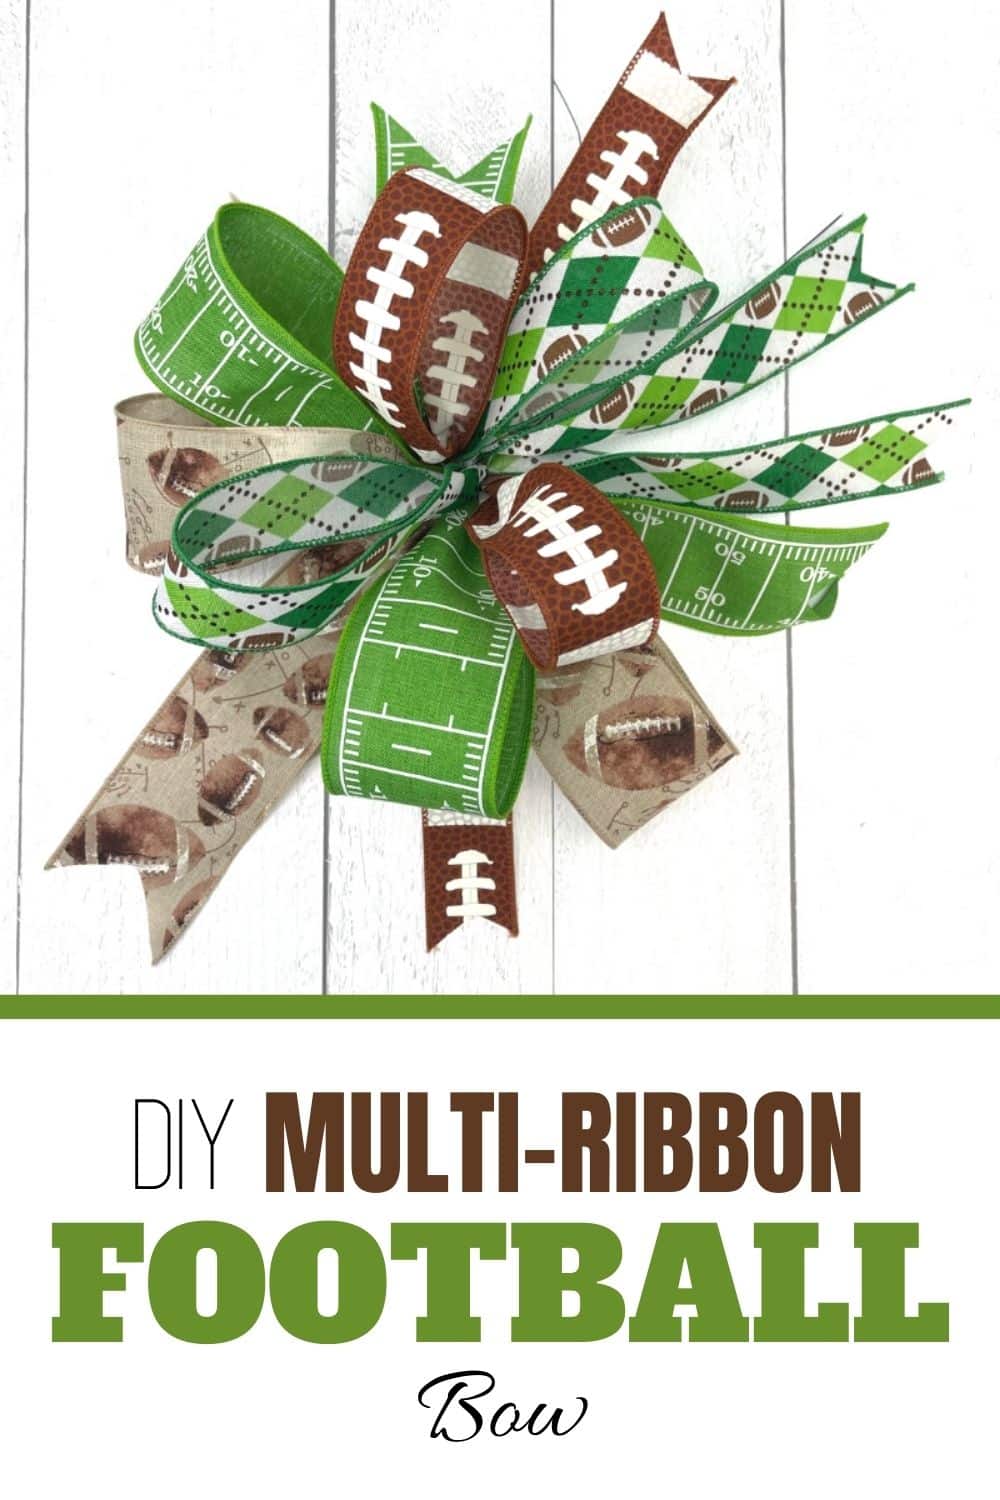
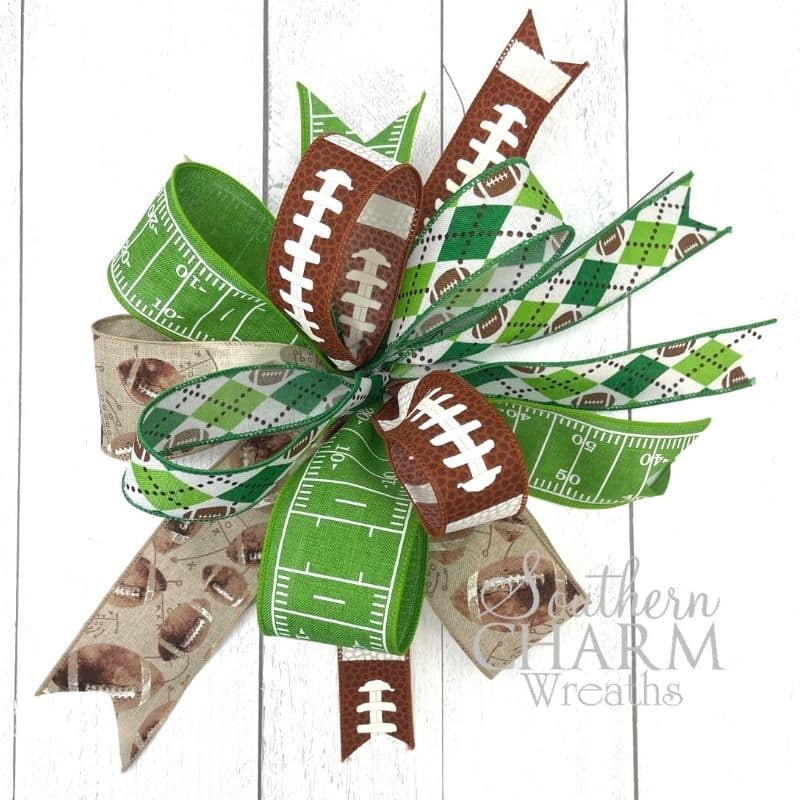
DIY Multi-Ribbon Football Bow
Learn how to make a multi-ribbon bow for any wreath project you have. In this tutorial, you will learn how to make this bow using just your hands or an EZ bow maker by following this step by step instructions.
DIY Multi-Ribbon Football Bow
Do you love football and crafting? Well, we have the perfect bow tutorial for you! Follow along as I teach you how to make your own multi-ribbon football bow. You may recognize this bow as it is the one I added to our DIY Deco Mesh Tailgate Time Football Wreath! It was the perfect bow for that wreath.
The best part about once you learn how to make a multi-ribbon bow is you can change up the colors of ribbons based on the type of wreath you are making. With this one, you can even switch up the ribbon color to match which team your favorite team is.
This post may contain affiliate links for your convenience. Click here to read my full disclosure policy.
Supplies for This Project
- EZ Bow Maker
- 2.5” Antique Football Wired Ribbon #40
- 2.5” Football Yardage Wired Ribbon #40
- 1.5” Lime, Emerald Green, and Brown Wired Ribbon #9
- 1.5” Football Pigskin Wired Ribbon #9
- 22 Gauge florist wire (or a pipe cleaner!)
- Scissors
- Craft Mat or ruler
How to Make A Multi-Ribbon Football Bow By Hand – Step By Step Tutorial
1. Getting Your Wire Ready
I prefer to use 22 Gauge florist wire as opposed to a pipe cleaner because I feel it holds better for my bows. But use whichever you prefer. The florist wire should be about 18” long. I like to have my wire ready and prepared before I start messing with my ribbon so I am not fumbling around as I work. We all know how crazy crafting can be, right?
2. Adding the First Ribbon
Grab your 2.5” antique football ribbon and leave a 6” tail to begin. Pinch it in between your 2 fingers in your non-dominant hand. As we work to build our bows, it will gradually move towards the palm of your non-dominant hand as your bows get bigger. The goal is to always maintain that section of the bow in the same hand, using your dominant hand to create the loops as you work.
On your mat, measure out 12” from your pinched section. Holding the ribbon away from you, to create your first loop. The loop will be 6”. Be sure you have your good side of the ribbon facing forward.
Place the bolt of ribbon on a dowel to keep it in place as you work. Twist ribbon so the pretty side of the ribbon is not facing you as you prepare to make the next loop of the bow. Make your loop pulling the ribbon away from you to gather it with your non-dominant hand. You will pleat and pinch the ribbon in your fingers.
You should now have 2 nice rabbit ears. Twist the ribbon so the bad side is facing towards you again and trim from the bolt, matching the length of your first original ribbon tail.
3. Adding the Second Ribbon
Grab your 2nd 2.5” green yardage ribbon and place it on your spool. Repeat the steps to make sure you begin with a 6” tail. Pinch your ribbon in your fingers and begin to create your next layer of loops for your bow. You will measure out again, or eyeball 12” of ribbon to create your 6” loops. Twist, pinch, and pleat your ribbon. Be sure your ribbons are facing the right direction, always maintaining a firm, but not a death grip in your non-dominant hand.
The trick to remember as you create your loops is if you are creating a loop below your thumb, always twist towards you. If you are creating a loop above your thumb, always twist away from you.
Create your 2nd loop for this layer of ribbon on your bow, noticing that your pinched ribbon is now moving closer to the palm of your hand. Remember to measure your loops as you work to ensure your loops are the same length.
Leaving a matching tail, cut ribbon from your bolt. Adjust your loops so they are mixed up a bit. Do not hold it too tight that you can’t adjust the loop placement and not cramp your thumb. You will soon figure out the perfect grip to hold it “just enough” to make the perfect bow!
4. Adding the Third Ribbon
Grab your 1.5” brown pigskin ribbon and place it on your spool to begin your 3rd layer for your bow. We will repeat the above steps keeping your tails of 6” in length and loops also 6” to match the first 2 layers of bow.
Once you have created your set of rabbit ears and cut off your ribbon from the spool, giving you 2 tails, adjust your ribbons so they intermingle with the 1st 2 layers of ribbons.
5. Adding the Fourth Ribbon
With your final 1.5” multi-colored ribbon, create your remaining layer of rabbit ears on your bow following the same steps.
Shift your ribbons and loops around to your liking so they are even on both sides. We want loops on top and tails on the bottom.
Remember not to switch hands. Always keep your pinched and pleated ribbons in your non-dominant hand. Adjust your lengths and placement with your dominant hand.
6. Adding the Wire
Now, pretend like you are looking at your watch with your ribbons firmly in your hand so the tails are now facing the top and loops are underneath. In your other hand, grab your floral wire. Lift your pointer finger up and add wire under it and rotate around. Before I twist it off, I check to make sure my loops and tails are relatively the same.
If pleased with loops, you will now twist the bow, holding your wire as it tightens with every rotation of your bow.
To complete your look, you will dovetail the ends of your ribbon tails by gently folding in half and cutting up towards the corners of the ribbons’ ends.
How to Make A Multi-Ribbon Football Bow With A Bow Maker – Step by Step Tutorial
1. Prepping and Adding The First Ribbon
Grab your easy bow maker and your antique football 2.5” ribbon. Be sure you have your 2 spools in the center of your easy bow maker to hold ribbons in place.
With the tail of your ribbon, cut a dovetail by folding it in half and cutting it up towards the edges. Slide that ribbon vertically between the 2 spools and twist so the good side of the ribbon on your tail is facing forward or on top. The backside of the ribbon, where we will be creating our 1st loop from, should be facing down.
Pull off enough ribbon to create a 6” loop, using the measuring lines on your EZ Bow Maker to help. Place that end of the ribbon into your 2 center spools twisting towards you which should leave you with your completed loop facing up and pretty, and the backside of your ribbon on the other side. Now when we pull the ribbon around to the front to create your next loop, the pretty side should be facing up.
Pull off enough ribbon to create another 6” tail and cut. Dovetail that edge.
2. Layering Your Additional Ribbons
Your 1st layer of ribbon is complete, so grab your 2.5” green yardage ribbon. Begin with your tail starting on the opposite side of what you did in step 1. Dovetail that end. Slide it in vertically, twist, and make your next loop of 6” again.
Twist and create your 2nd loop by bringing it forward, making sure your ribbon is facing up and is also measuring 6” in length, Cut your ribbon from the bolt leaving a ribbon tail for the other side of your bow. 2 layers down. Let’s keep going.
Repeat the steps as you add your remaining two 1 ½” ribbons. Begin first with your brown pigskin ribbon. Carefully completing each step as before. Then complete your bow with your multi-colored ribbon. Don’t forget to dovetail those ends.
3. Tying Off Your Bow
And now we can get ready to finish the bow and take it off the EZ Bow Maker. Start by puffing up the loops and adjusting them until they look about right.
Then lift the whole bow an inch or so up the spool poles. Don’t take it all the way out! Now take a piece of florist wire and slide it between the poles underneath the bow. Pinch all the ribbons together in the middle and slide the bow and wire off of the EZ Bow Maker together.
Spread out the loops so they are evenly dispersed in their coloring in the bow. Then just tighten up the wire and twist the ends to secure.
And that’s all there is to it!
If you’re more of a visual learner, watch the video tutorial below and see exactly how I made this bow.
Watch The Video: DIY Multi-Ribbon Football Bow
If you enjoyed this post, you might also like:
- How to Make a Bow with Two Pieces of Ribbon
- How to Make a Fall Multi Ribbon Bow with Raffia
- DIY Deco Mesh Tailgate Time Football Wreath
Like this Post? Pin it for later!