DIY Summer Silk Flower Ladybug Wreath Tutorial
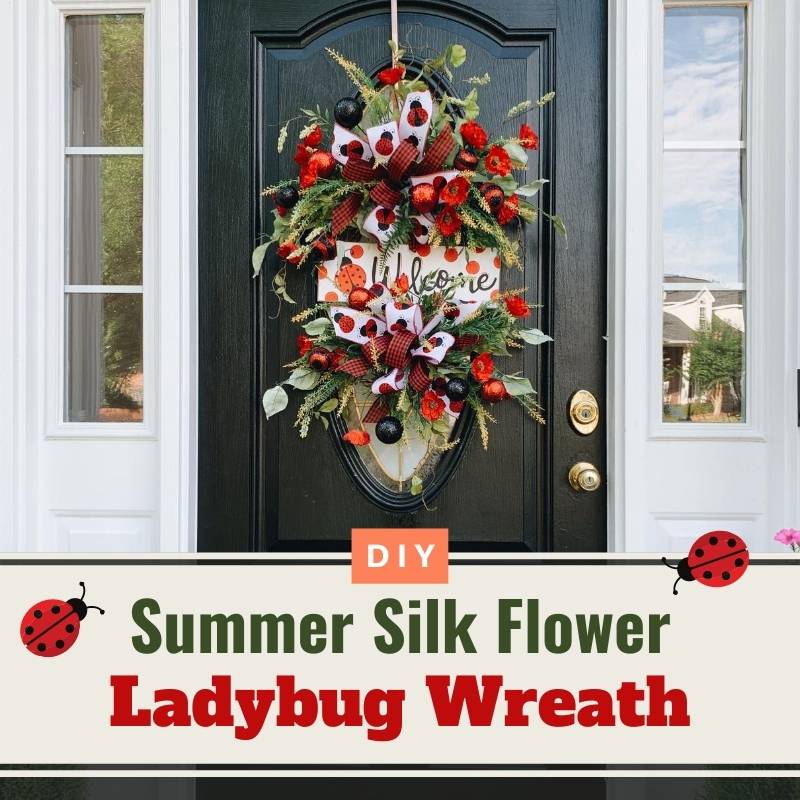
Alright wreath makers, here it is! The last summer wreath tutorial of 2020! We’re moving onto fall now but I couldn’t resist getting these cute little ladybugs out there before we flipped the switch. Watch the video below or keep reading to learn how to put together this bright and happy silk flower ladybug wreath for your own front door!
This post may contain affiliate links for your convenience. Click here to read my full disclosure policy.
Ladybug Wreath Supply List
You’ll need:
Grapevine Wreath
Ladybug Welcome Sign
2 Spools of Coordinating Ladybug Ribbon
2 Greenery Sprays
Red Silk Flower Spray
Yellow Silk Flower Tassel Spray
Black and Red Ornament Stems
All of the supplies I used for this project are from Greenery Market, one of my favorite online wreath supply stores!
You’ll also need:
Wire Cutters
Florist Wire or Pipe Cleaners
Hot Glue Gun or Glue Pan
Hot glue
Craft Mat
Easel (optional)
Putting Together Your Silk Flower Ladybug Wreath
Step 1 – The first thing you’ll need to do is make your bows. We’ll start out with the ladybug ribbon and make three 12″ loops with 8″ tails. Then add in another set of 8″ tails. Next, add another three 12″ loops of your coordinating ribbon with 8″ tails.
You should have six tails and six loops when it’s done. Go ahead and tie it off and repeat one more time so you’ve got two bows. Now we’ll get started on the wreath!
Step 2 – The main focus of this wreath is the ladybug welcome sign, so we’ll start by getting that in place and then add everything else around it. Use a couple stems of florist wire, stapled and hot glued to the back of your sign to attach it to the grapevine wreath base. Next, use another stem of florist wire to attach each bow to the top and bottom of your wreath.
Step 3 – Now it’s time to add the greenery and silk flowers. I always start by taking each stem and giving it a couple little bends to fluff it up a bit. Next, use a bit of hot glue to place each stem into the grapevine behind and around each bow.
Be careful not to cover up your welcome sign too much. We want to be able to see the cute little ladybug!
I always start out with the greenery and add the silk flowers after, so that I can build up a nice background for the flowers.
Then I go in and place the flowers so that I can see all the texture and extra dimension that they will give to the finished project. It’s harder to see that if you add the flowers first and then try to go back and put in the greenery behind it.
Step 4 – The last step, if you want, is to go back in and add any ornaments or extra stems to really finish out your design and bring everything together. Glue in your ornaments the same way you would glue in the flower stems and then give everything one final look to make sure there’s no big gaps or overcrowded areas.
Once you’re happy with the placement, it’s all done!
See you next time!
Ladybug Silk Flower Wreath Video Tutorial
If you enjoyed this and want to learn to wreath the professional way, join me in our exclusive Wreath Making of the Month Club!

Happy Wreathing,
Julie
If you enjoyed this post, you might also like:
DIY Deco Mesh Bumblebee Wreath
How to Make a Summer Multi Ribbon Bow
Was this Tutorial Helpful? Pin it to save for later!

Just gorgeous! Can you advise what glue you use please? Im in Scotland so supplies are extremely difficult to buy. I always bring back a suitcase full of craft things when i visit my son in Kansas. Ive added poppies and ladybugs to my list for next visit!
Gorilla Glue from Amazon
How did you make that beautiful now? ?