DIY Halloween Witch Wreath
Making this playful DIY Halloween witch wreath could not be any easier. Just follow this tutorial and you’ll be displaying or selling your own impish wreath in no time at all.
How To Make A DIY Halloween Witch Wreath
Do you enjoy decorating for Halloween? If you have a shop, selling Halloween wreaths can be very lucrative. Lots of people love to decorate their front door with silly little kid-friendly, not-very-scary wreaths.
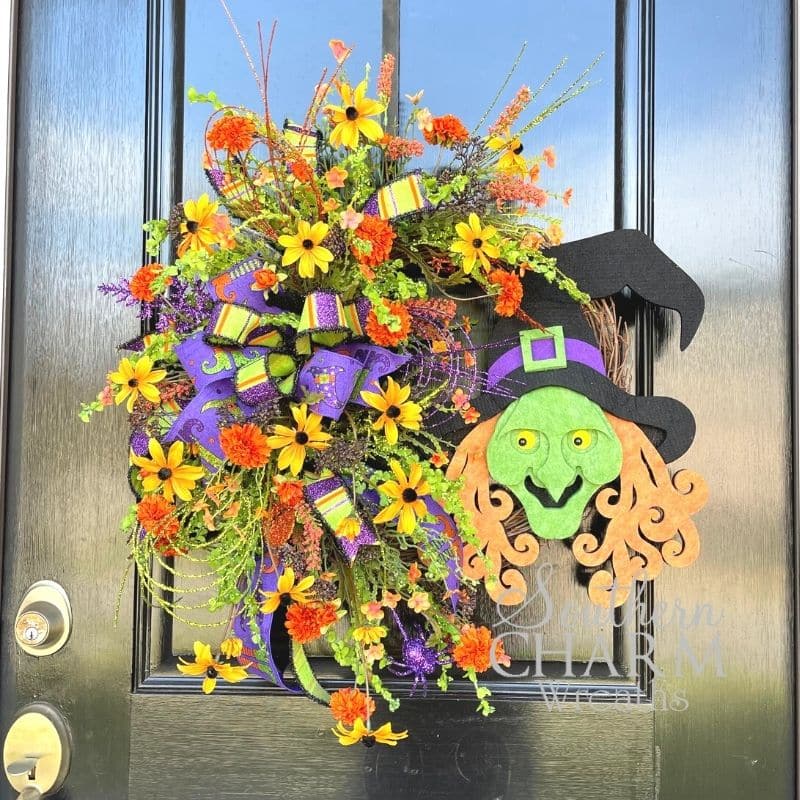
When I saw the witch sign I knew I had to make a wreath around it! The bright green on her skin is the perfect base to build on and her impish grin and little side-eye were a lot of fun to play around with.
This DIY Halloween wreath is nursing with colors, but all the florals and silly accessories support and bring more attention to the focal point – that fun little witch sign.
As you read this tutorial, I hope you discover how simple it is to create a wreath for Halloween. If you are a visual learner, I have a video you can watch. Grab your supplies and make a Halloween witch wreath along with me.
This post may contain affiliate links for your convenience. Click here to read my full disclosure policy.

Supplies for this project:
- 22 gauge Florist Wire
- 16 inch grapevine wreath
- 2 1/2-inch wired ribbons
- Rustic Wire
- Fall-Colored Greenery
- Pumpkin Bunch With Leaves
- Felt Witch Sign from Trendy Tree
- Wire Cutters
- Glue Pan
- Staple Gun
How To Make A Halloween Witch Wreath: Step-By-Step Tutorial
1. Decide Your Color Scheme
The first step in any wreath-making project is to decide what the color scheme is going to be. For this one, the witch’s skin is bright green, her hair is orange, and there is a purple stripe on her hat. So, I pulled from those three colors.
I used a bow that we made in our Wreath of the Month Club. One ribbon has a purpose background that matches the witch’s hat, and the other ribbon in the bow matches the witch’s face.
Then, look for flowers that also bring out the colors from the sign. Orange mums and babies’ breath are a darker orange and look perfect with the curls on the witch’s hair.
I also found some fun Halloween picks that have purple, orange, and lime green in it.
There is some yellow in the witch’s eyes, so I thought I’d try to bring that out with some yellow leaves.
Have fun with it and use your focal flowers and define your line with some leaves or longer flowers.
2. Attach The Sign To The Wreath
I used a 22-gauge floral wire to attach the soft sign to the grapevine wreath. Since this is a soft sign, you can literally poke the wire through the sign and then thread it into the grapevine.
Wire it in at least 3 spots so that it is nice and secure. Another way to make sure it is anchored really well is to add some glue to the back of the sign and glue it to the grapevine.
3. Add A Wreath Hanger
Twist rustic wire into an oval shape and thread it through the top of your grapevine wreath. Then, twist it until you make a hanger shape.
This is the easiest way to make a hanger that will keep it straight as it hangs on your front door.
You can see a step-by-step tutorial on how I make a hanger on the back of a wreath here.
4. Place Your Bow On The Wreath
I put the bow on the opposite side of the sign so it will balance out the design of the wreath. The witch is in the bottom right corner so I put the bow in the top left corner.
Use the florist wire to attach the bow to the grapevine wreath.
Whenever I attach anything to the grapevine, insert the wire through the grapevine, not around it. This gives it stability.
5. Create The Line Of Sight With Greenery
Insert the longest pieces of greenery first, extending them around the top and bottom of the bow so that they frame the bow and direct your eyes to the large sign on the other side.
This is the base of your floral design. The pieces are the longest and do a fantastic job of forming the transition point. The bow is the transition point. This is also called a central binding point. It is where your eye focuses and goes outward. Anything above the bow goes up and anything below the bow goes down.
6. Add Flowers And Picks
Now is the fun part! Start adding your favorite types of flowers on top of the greenery. Start at your transition point, which is the bow, and place them up or down around your wreath.
Use as many different types of flowers and fun picks as you want to. Always look at your main focal point and pull out the colors from it.
Make sure that you are keeping the area at the top of the bow balanced with the area at the bottom.
Watch The Video: How To Make a DIY Halloween Witch Wreath
If you enjoyed this post, you might also like:
- DIY Halloween Deco Mesh Wreath
- How to Make a Whimsical Halloween Door Swag
- DIY Pottery Barn Inspired Halloween Wreath Tutorial
Liked Learning How To Make A DIY Halloween Witch Wreath? Pin it for later!

How do order this wreath kit
Hey Shirley – there is no kit or bundle for this wreath. Julie created this with supplies she hand on hand.
Your instructions were very clear. I have used zip-ties and pipe clearers. I like how you should the wire. Thanks for sharing.
Bridgett
My husband of 47yrs has advanced dementia. He loves watching your show on TV’s YouTube mostly due to the slower pace and feels you’re talking directly to him. 🙂
So when your camera moved you farther away from it, he didn’t stay interested and I couldn’t see the details of how you were doing things either.
Sooo please don’t change slow format or so far from camera it’s hard to see details of work.
LOVE you and you’re show.
And benefits my sweet hubby with a calming effect! ?
Sue 9/14/21
This made my day. My dad had Alzheimer’s and I know how difficult it is. Thanks for the reminder.